


How to use Picnik.com + Quick Picnik Tutorial

One of our awesome readers, Diane wrote me an email a few weeks ago and asked this question:
“I don’t have a DSLR camera, nor do I think I’m going to get one in the near future, because they are quite pricey, but I was wondering if you could tell me a little more about this Picnik site that you use all the time. I have tried it out and I like what I CAN use, but it wants me to pay more to use ALL of the cool detailing and editing stuff. Is it REALLY worth the $25.00 a year? What am I missing out on?”
First of all, yes… I said she sent this email a few weeks ago. I’m terribly behind on email and trying to claw my way back to the top of at LEAST the second page of crazy-ness, known as my inbox 🙁
Sorry if it’s taking me forever to get back to you. I also feel like I’m not commenting back as much as I normally do because of this time of year (heading into the busy months of the holiday seasons). It is gettin’ CA-RAZY for me, and I’m really trying hard to answer all the emails as they come in, plus post regularly AND deal with all of the “behind the scenes bloggy business stuff”. Bear with me people. lol
Okay, so to answer your question Diane…
YES! The $25.00 extra each year is TOTALLY worth it for your Picnik.com upgrade. Whether you have a point and shoot or a DSLR, the upgraded version of Picnik completely rules my socks off!
I have talked a little about this before, but you can do lots of Photoshop type editing right in Picnik. From covering skin blemishes, to brightening eyes, rounding corners of pictures and also making awesome, blog ready collages! Picnik has pretty much turned into my one-stop-photoshop-spot.
🙂
Oh, and PS… it’s SO EASY TO USE! Let me show ya.
This tutorial MAY be a bit elementary for some of you, but I am a huge fan of step by step instructions when learning something new.
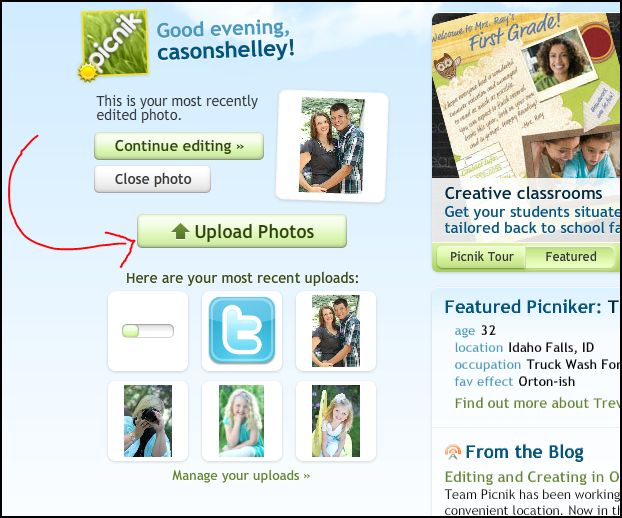
First, log onto Picnik.com and create an account. Then, if you feel so inclined (and you should) upgrade to the better version for the one time payment of $25 bucks. Then, you’re going to see a screen that looks similar to this. Go to the “Upload Photos” button, and upload the photo(s) that you want to edit.
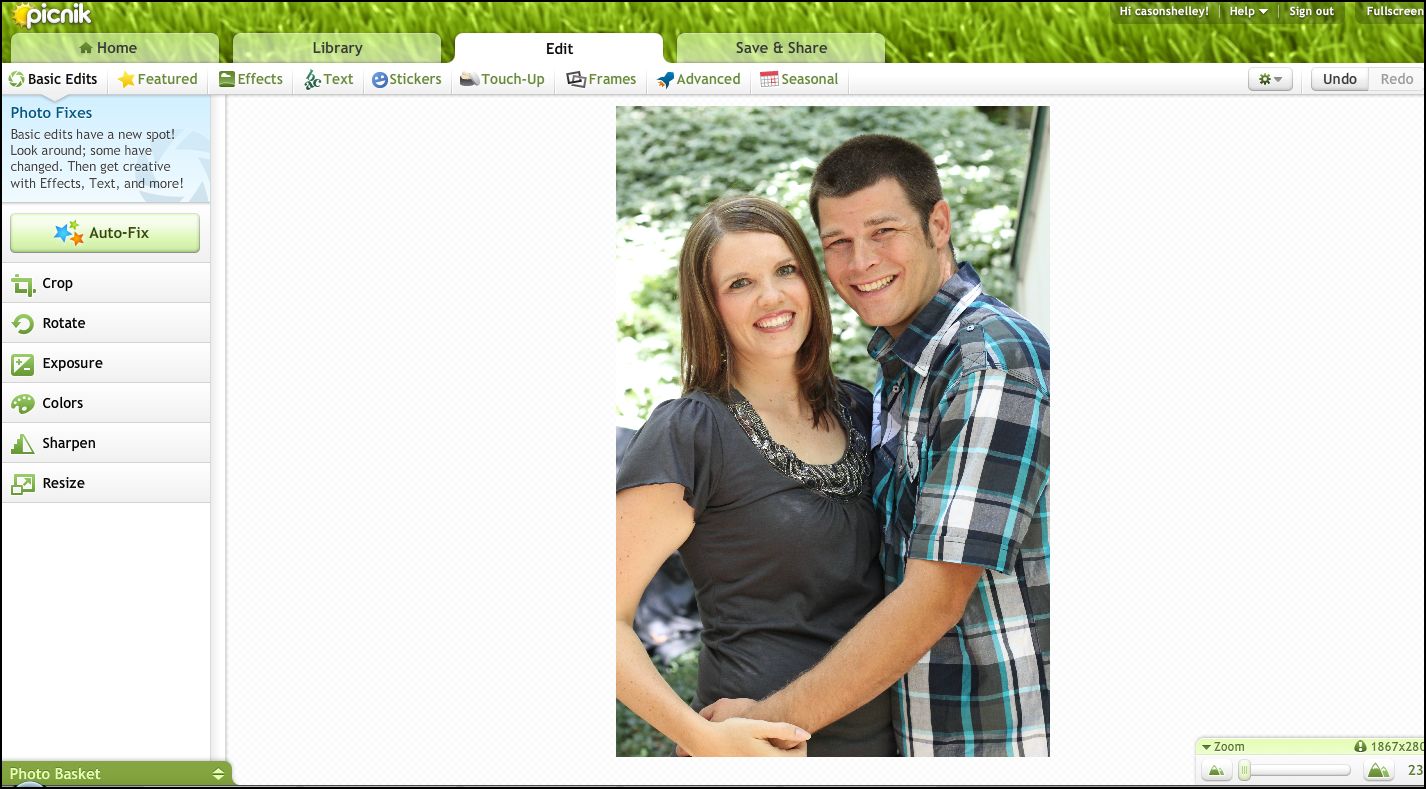
Once you finish uploading your photo, you’ll be sent to a page like this:
I’m gonna use my cute sister and her hubby, as my guinea pigs 🙂
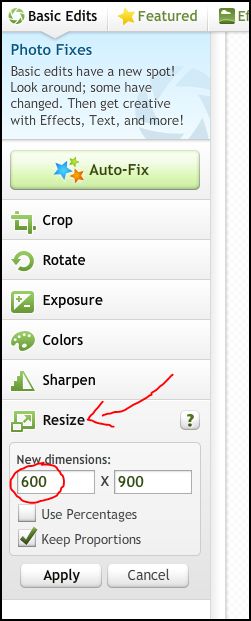
Now first things first, resize that baby down. My photos (and probably yours too) are HUGE when you try to upload them to your blog. This makes for very slow picture loading.
So just look under Basic Edits and click on the resize button down at the bottom and make the picture the size you want. For MY blog a full size picture is always 600 pixels wide (because that’s about how wide the body of my blog is) If you change that first number, the other will automatically change, to compensate the size for you. Push apply, and you’re done!
Now for the fun part. Editing… or as I like to call it “Makin’ everyone a lot brighter and purdy’er“
🙂
I always start with Exposure, contrast and highlights, again, found under the same Basic Edits tab.
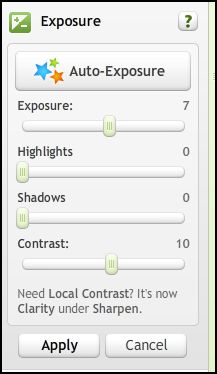
If these three things get bumped up a few notches, then it usually can change the entire look of your photo. Making it brighter, crisper, and the colors more defined. Definitely ALL more “blog-worthy” traits.
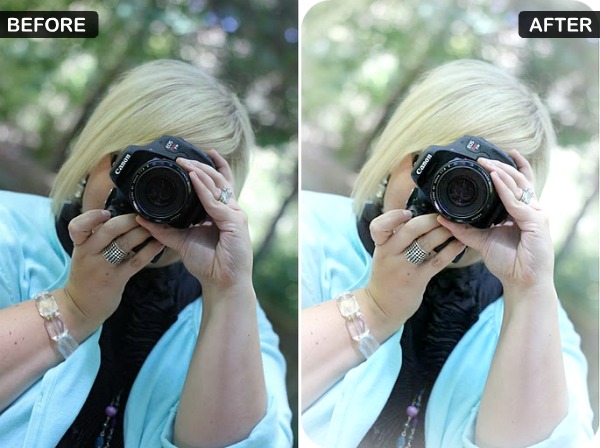
Here is the example of my before and after of this photo, with JUST those minor changes.

You can see that all it does is lighten up the picture just a bit, and accentuate the brighter areas where the light was hitting.
Next I use some of my favorite tools. They are located under the Touch-Up tab.
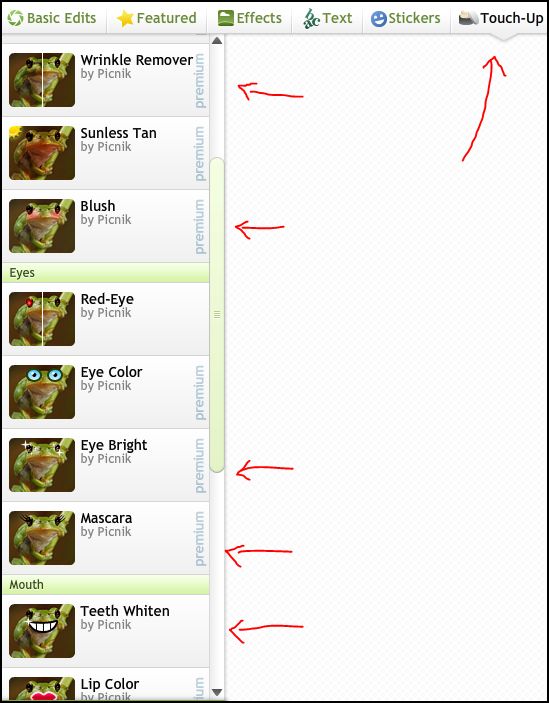
This is where individual taste comes in. I like to have my photos look natural, but still have that flawless sparkle. I’m talking smooth skin and twinkly eyes. And with just a few drags of your mouse, you can turn a good portrait into a GREAT one! It takes a little trial and error, but once you get the hang of how all of the different options work, then it’s really fun!
Here is what my final edit looks like.
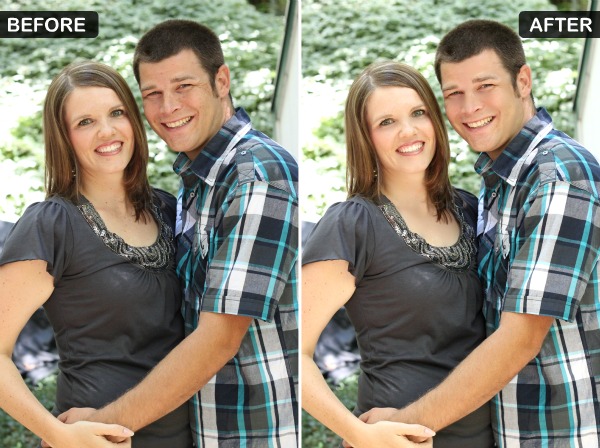
All I did was take the Winkle remover option and hit a few of those deep lines and dark spots or freckles, whiten his teeth a bit, put some sparkle in her eyes, and you’re done! A pretty, ready-to-frame (or blog) photo!

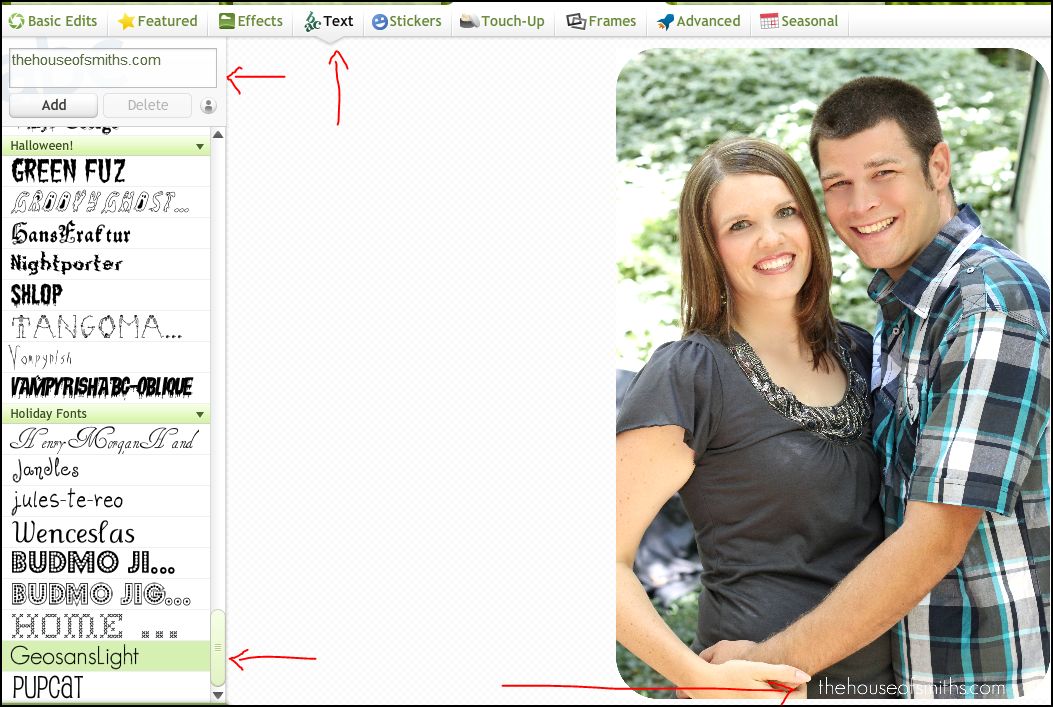
Oh, and don’t forget to watermark your image! I think that this is SO important, especially when posting an original project because nowadays there are so many people sharing so many photos of projects on different blogs and sites, and sometimes they don’t even know where the original project started!
(arrrg, that could be a whole other post in and of itself)
To do the watermark all you do is go under text, type the words you want, pick your font, and add it on your photo. Easy as that.
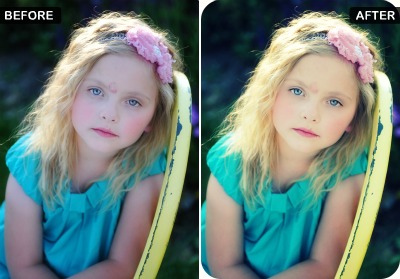
Honestly, there are LOTS of things you can do with Picnik. They have really cool processes that you can run your photos through… like this different one called “cross processing“
It kind of gives your photo a vintage, contrasted, warm look.
And this one called Matte, with a white fade and rounded corners.
but those few basic techniques above have been what I find the most effective for photo editing, for the “normal” looking picture.
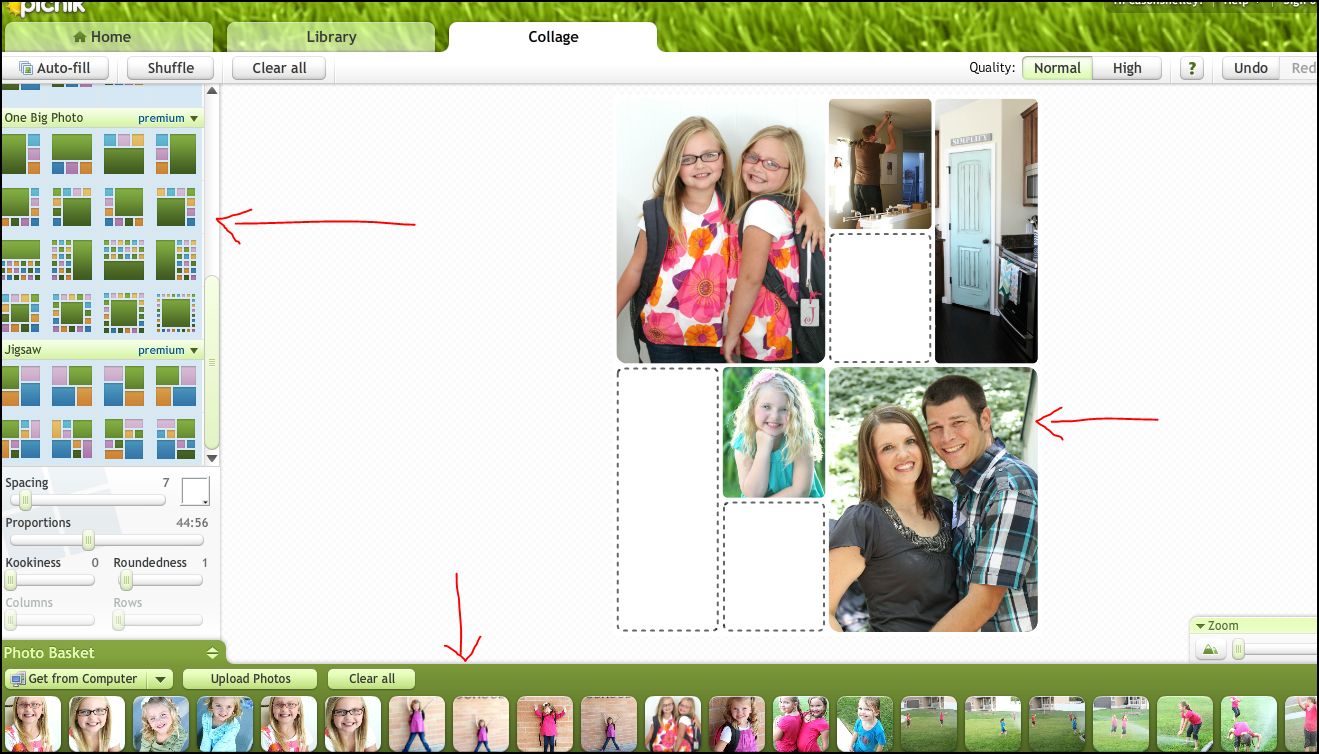
I didn’t touch much on the collages, but those are pretty self explanatory. You just hit the collage button on the home page, select your images, drag them to your chosen layout, size the entire thing down to what you need, and you’re done!
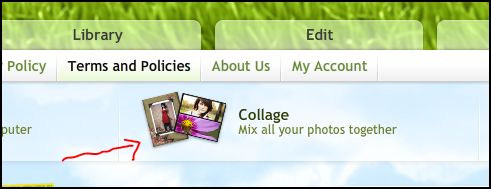
This is also where your extra $2.00 a month comes in, because you get a LOT more options when making collages.
Whew! That kind of turned into the longest post EVER. LOL. Hoped it helped!
I know that a LOT of you have wanted more information on where I do my collages, and how I QUICKLY edit my photos, and now… you know! 🙂
You can find other related posts on photography tips and tricks here:
How I learned to use my DSLR camera
Using my manual DSLR settings and Picnik to edit a dark picture
How I learned to use my DSLR camera
Using my manual DSLR settings and Picnik to edit a dark picture
Happy Editing!

BluBabesCreate says
Okay, like all of my photos need to go through this site all of the time! Thanks for reminding me again why I need to use it!
Funky Junk Interiors says
Nice tute! My niece is a dynamo with Picnik in her teens. Mine still look muddy but I'm getting there. 🙂 Thanks for the encouragement to upgrade. I think I will!
Donna
Classy Clutter says
i loooooooove picnik and I totally agree. So worth the extra $25! I use it for almost every post. Heck, I've been using it for every post lately! I have photoshop and only use it for more in depth photography editing. Plus it makes my computer run slowly if I use it with other programs running. (insert big fat sad face here!) I hate when my computer acts slow. Maybe bc I have a kajillion pictures on it! uh-duh! Great post shelley!! xoxo, Mallory
Kimberly says
great info, I love this website and use it to edit all our photos, but often wondered about upgrading. thanks for answering my question too!
Erin {Lavender and Lemon Drops} says
Thanks so much for the picnik scoop! I was curious how you made your awesome collages. I'm purchasing my years worth of picnik asap 😉
Tera says
Thank you for this post! I love the collages you do but didn't know how you go about making them. And I'm always looking for awesome editing techniques for my pictures, so again, thank you!
Katie @ Wildwood Creek says
Thanks for the great tips!
Nancy says
Thank~You so much!! I have never really known quite what to do with Picnik. So I followed, I joined the Upgrade, and Voila. With out your follow with me here, I don't think I would have ever investigated the Upgrade on my own. Again, Thank~you so Much!!
Huggs, Nancy
coeurdalenegifts.blogspot.com
Anonymous says
great 'how to' !
Sunshine Blossoms says
This is a great post! Thanks for the tutorial!
missy s says
wow thank you for this!! i just assumed you used photoshop! my daughter loves this site, so i may just do the $25 thing!! thanks!!!!
{hooked on hickory} says
just found out about this site! obsessed! good to know about the upgrade. sooo funny that i did a post about this last week! great minds think alike!
ashley
liZ says
Ok…loved this post. I just try to get everything right with my camera and no editing (because I'm too poor for photoshop).
This looks awesome and I think I could do it. I'm totally goinjg to try it out this weekend.
Thanks
liZ
(simplesimonandco)
Megan and Will says
You rock!! Thanks for the post 🙂
Mandy Lou ♥ says
I love picnik! I have struggled printing pictures after I edit them. What size do I need to save them as for printing? Help….
aimee in Or.
Anna@Directions Not Included says
Thanks for sharing! I've been using it but hadn't thought about the paid version. Totally get it now.
Andrea says
Another thank you from me as well. Great tutorial…I was always wondering how in the heck your pictures turn out fabulous, really. I always said to myself in a jealous tone, her girls have the most beautiful, twinkle in their little eyes. Now I know ;). Thanks for always sharing great posts, keep it up!
waikikimum says
Thank you for the tips. I use the free version of Picnik but think I will upgrade. Also, thanks for the tip on re-sizing photos before loading them onto blogger mine always took so long to come up. Now I feel dumb I didn't think of this before DOH !!!!
Laci says
Ha ha YOU rule my socks (and shoes) off!!
xox
Kara says
Thanks so much for this post Shelly! I've been using Picnik and love it, but I wasn't sure if the extra $25 would be worth it. You've convinced me–I'm off to upgrade!
Unknown says
I found Piknik from another friend blogger and love it! I've debated about getting the premium option and think it's time to upgrade. Thanks for the extra little info lady!!
Meshell says
Thank you, thank you, thank you! That was ALOT of help for me. I'm going to subscribe ASAP
A. Renee says
Hi,
I have a question for you. 😉 Awhile ago you posted pictures of your kids in your house. I don't think it was about photos though. The background was just a beautiful white. I was wondering how you got that look. Edited, natural light, your house is just really bright inside 😉 Thanks, Amanda
Lisa says
OH MY!! You are my new best friend. The one you go to for advice and the one that helps you learn new stuff and doesn't make you feel dumb for asking!! Thanks for the info !!!
I want to go play right now
Unknown says
I just started using it this week and LOVE it!! Thanks for some more tips!
Victoria ObSEUSSed says
Thanks so much for explaining this Shelley. I've actually been searching your site in the past week looking at your Picnik info because I love the look of your collages. I've been using Picasa and Microsoft Digital Image Pro forever but I want to try some of the diff. features you mention about Picnik so I signed up last week but the trial only lets you upload 5 pics and I wanted to try making a bigger collage before buying the whole program. I also wish they'd just have a flat fee option instead of $25 annual fee. This post convinces me to try it at least for a year for now. Thanks!
Unknown says
I have been using picasa for some time and you have inspired me to move up to piknik. Thanks for opening my eyes!
Kathy says
You had me at wrinkle remover! Thanks for the tutorial.
Kathleen says
Hi, I just wanted to say thanks for the great tutorial. I've flagged your post so I can go back again and again.
Small Medium and Large says
How do you print your collages? Do you use a service? I would LOVE to know. Thanks. 😀
Miss Charming says
Great tutorial! It's nice to know that there's hope for my point and shoot after all.
CoreysGal says
Thank you for this! You inspired me to get the annual membership finally! I gave you a shout out on my blog for it if you want to check it out. 🙂
coreysgal.blogspot.com
Redmomof4 says
You said you have a 50mm lens on your camera all the time, can you tell me more about your lens? I'm looking at the T3i and am trying to figure out what to buy. Your pictures are great! I hope to take one of Emilie's classes early in the spring!
Mama T says
Thank you so much for posting this! Great tutorial and I've been searching for a program to watermark photos. I've been following your blog for a few months now (love it!) and I really enjoy reading. Have a great day!
Babsarella says
Been using Picnik for a few years now and think it is FANTASTIC!! So many options and I love that I can take my photos from Flicker (where I load everything), make changes, and save them back to Flickr.
rotner ramblings says
This is SO helpful. Just started blogging, rotnerramblings.blogspot.com, and this will change my world. Thank you for sharing. P.S. LOVE your banana bread, thanks for sharing the recipe.
Carrie says
Thank you! Thank you! Thank you!!! I have been working my way through My 3 Boybarians 31 Days to Better Photo Series from last October and this post came at exactly the right time. She started talking about Photoshop and I knew I wasn't going to buy it. So I've been Picniking up a (free) storm instead! I'm going to upgrade next month to the premium account.
Love your blog and your home!
Unknown says
I have used Picnik for over a year now. I do not have a DSLR camera either and I touch everyone of my photos with Picnik or Pixl. Picnik is so easy to use and I def. recommend the Premium version! 🙂
Unknown says
I have been using Picnik for over a year now. I do not have a DSLR camera either and I touch every picture with Picnik. I would recommend the premium version as well. What is your favorite editing tool? 🙂 Love you page!