


Layered Molding Board & Batten Tutorial – Master Bathroom
Just like I promised, we’re back with another master bathroom project today! If you missed yesterdays post about our vanity makeover, then you can check that out below, along with a few other master bathroom project links from the past.


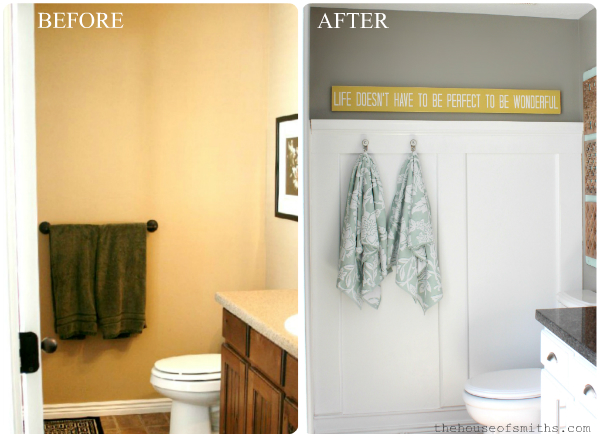
Today we’re going to share a layered molding board and batten treatment that we applied to the largest empty wall in our master bath, that we now use to hang our towels on.
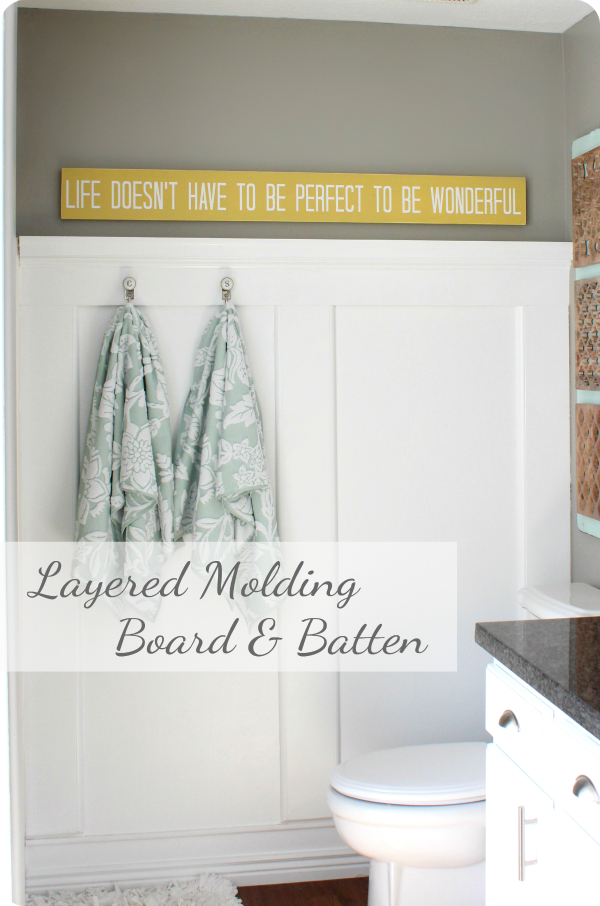
We wanted our bathroom to appear as large as possible, because it’s so small, so we knew that some sort of white, clean molding would do the trick. We thought about doing the same sort of board and batten wall treatment that we put up in Aubrielle’s old room…

…but we wanted the look in our bathroom to be a bit more masculine and “chunky”,
so here’s how we did it:
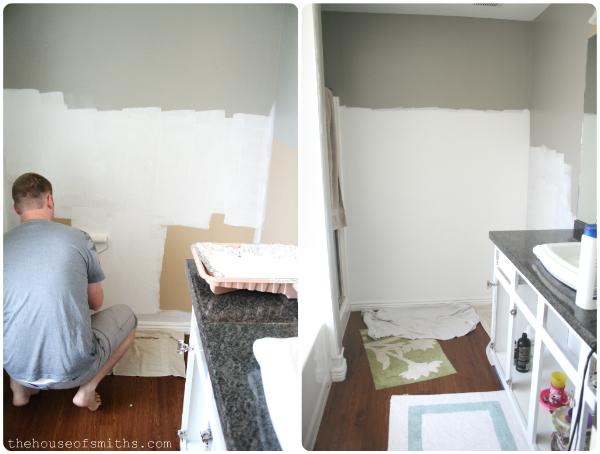
We started off by painting the actual wall white first. I know you can put MDF and other flat pieces of wood or paneling on the wall for a super smooth finish, but we always just save our money and paint the wall white, to make it just LOOK like it’s all one big piece of molding.
🙂
Next we figured out our wall design and laid it out, so we could see how it was all going to fit together.
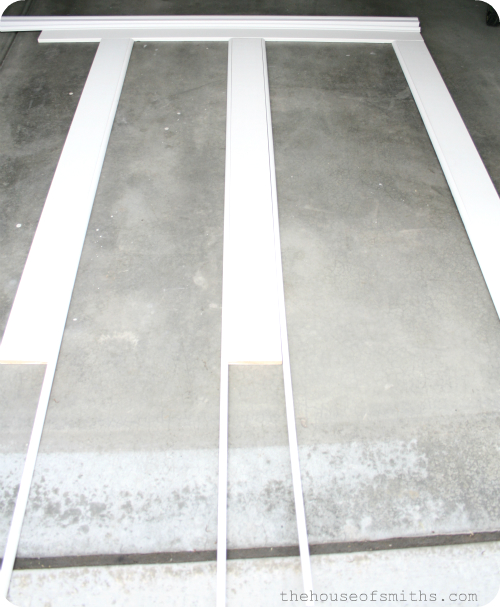
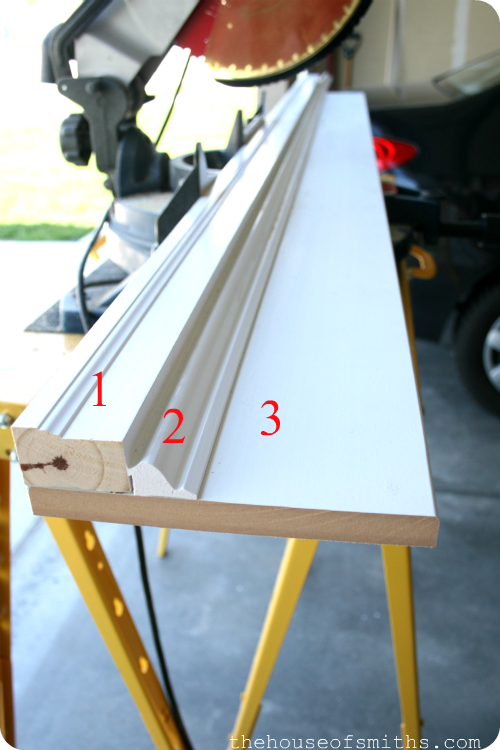
By using a piece of thick brick molding, some decorative picture frame molding and quarter round, we were able to turn a few plain, primed, MDF boards into a look that was a lot more interesting! Have you ever done this? Layering different moldings on top or under each other to get a totally different look? It’s actually pretty fun, and can save you some money in the long run!

Our molding design was essentially two different pieces.
1. The top piece or ledge and 2. The vertical 6 inch primed MDF boards with trim on either side.
To make applying the molding to the wall a lot easier, we assembled the top ledge prior to attaching it to the wall. Because molding can be pretty fragile we used a strong adhesive to adhere everything, and then just a few small finishing nails and some tape to keep a couple of pieces in place while things dried.
If you use JUST nails when applying molding and aren’t careful, sometimes it can crack it.

Once everything was dry, our ledge piece was really easy to cut to our exact specifications; and because it was all in one piece, we didn’t have to worry about any of the individual pieces being off at all.
Our ledge went up first. We ran it the same height as the top of the shower surround, and nailed it up with a nail gun and finishing nails.
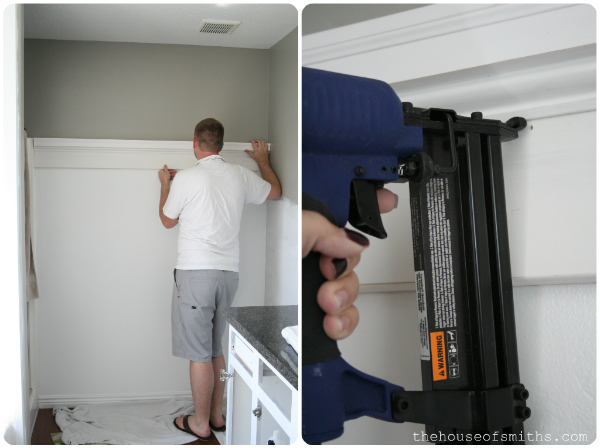
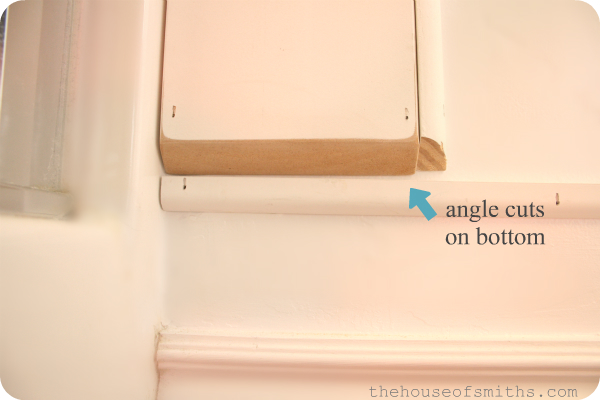
Then the vertical 6 inch MDF boards went up under the ledge, with the quarter round on the exposed squared off sides. Because the boards were a bit thicker than our faux chunky baseboard treatment, we just used our angled chop saw and sliced a small angle towards the bottom, so everything met up better and blended in.
You can see our tutorial for Faux chunky baseboards below.

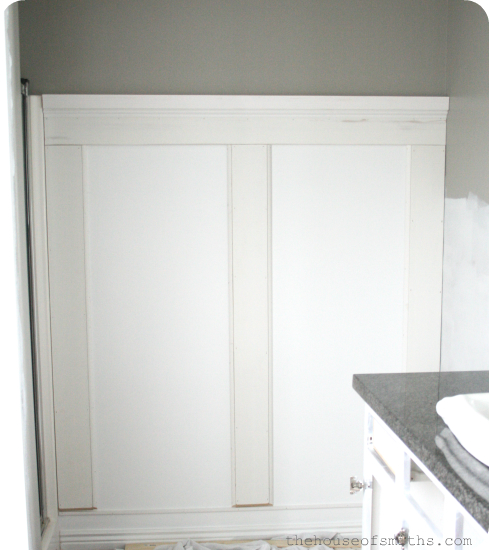
This is a shot of what everything looked like once it was all up. We had thought we might want to take this wall treatment over behind the toilet, but in the end we decided against it.
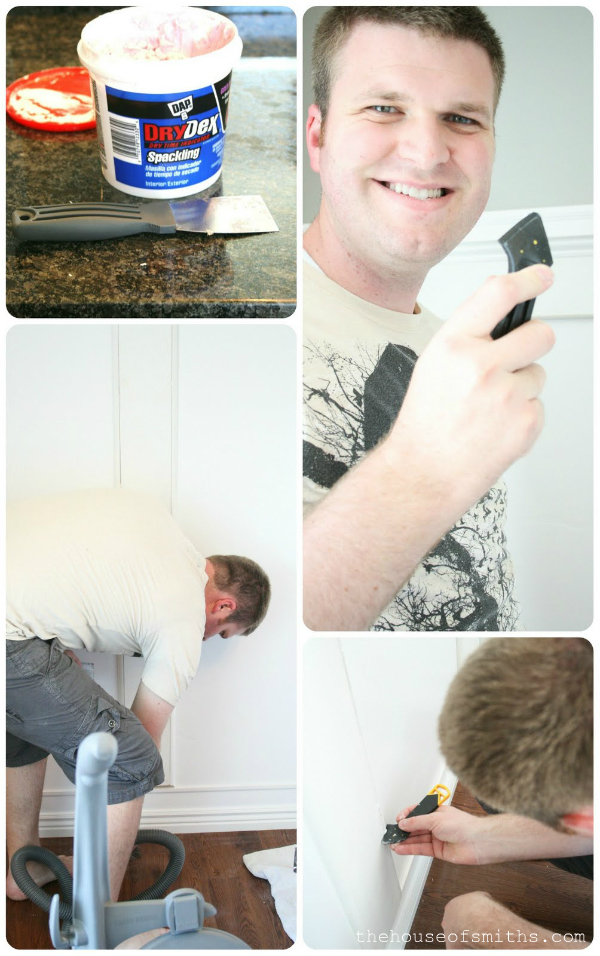
Next was the monotonous work of filling in nail holes, painting everything white and running caulk along all the little gaps and spaces. Even though these few steps can be really time consuming, they’re super important. It’s what makes the whole look really come together!
We purchased the monogrammed hooks at Anthropology and the mint colored towels at World Market.

At the beginning we toyed around with the idea of propping pictures or art against the ledge and the wall, but decided we didn’t want to take the risk of anything falling down. I still wanted a bit of color in the space though, so I made up this really simple, fun, happy-yellow sign with one of me and Cason’s favorite quotes on it. “Life doesn’t have to be perfect to be wonderful.”
The board is just a 6 inch piece of wood I purchased at Lowe’s that I painted yellow. We’ve also made the vinyl available for purchase in our Design Shop!

We’re in LOVE with how this wall turned out! It’s sophisticated looking and makes the room feel a lot larger because it draws your eye upward, instead of stopping at a short little towel rack in the middle of the wall. We were a little nervous that all the white would have the room looking a bit stark, but we’ve found that it just makes the space feel a lot fresher and more welcoming than before. PLUS, adding fun pops of color to warm up the space and give it personality (that can easily be changed out later on if we want) is way more fun!


Nana says
I LOVE your Board and Batten in your bathroom. I really want to do this in both our bathrooms and our family room. I just love that you love the country style. So do I. But I'm having a hard time knowing where to start. I have a wonderful home but its not how I'd like it it be. Reading your blog encourages me to start somewhere. Thanks for giving me the kick start to start with something and do it little by little. By the way, what grey color did you use in the bathroom?
I love your blog and am so excited when I see a post! You always make my day!
Ronda Batchelor says
Loving the yellow sign!!
Lil Mama Stuart says
Good point about drawing your eyes upward instead of stopping at the short towel rack!
Janet says
Beautiful! I love the colors you chose!
Unknown says
what an awesome transformation! love the pop of yellow from the sign!
KIM {POPPY SEED PROJECTS} says
Love it! Will totally be adding this moulding to my house :). Thanks for the great tutorial!
Unknown says
I looks amazing!! Love the whole look!
shelley says
So beautiful! It's nice the toilet doesn't 'pop' either with all the white surrounding it.
Emily [On the V Side] says
This is super – thanks for the tutorial!
Classy Clutter says
Wowza! How's that for an awesome before and after! It looks totally custom and fresh in there now! Definitely looks bigger too! Beautiful work!
Mallory @ Classy Clutter
Lisa @ Fern Creek Cottage says
Wow! What an impact! It looks beautiful!!
Anonymous says
wow looks awesome!
Unknown says
Wow – what a dramatic change. Great work you guys!
Choate Family says
Love it, your bathroom looks great! We have been wanting to do something in our daughter's room.
Maili says
I love it!! I've been looking for something to spruce up our guest bathroom… this would be perfect! Your house looks amazing, and I love all your ideas!
Steph Keaney says
LOVE LOVE LOVE
Stacey says
That looks wonderful! We were just talking about doing one of the bedrooms in our house. Thanks for the thorough tutorial.
Anonymous says
what is the wall color?
Jen says
I love the molding, it really added a nice touch to the wall. Your quote board looks perfect there too!
Melanie@Crafty Cupboard says
Beautiful, I love it!
Laura says
I adore this!!!
House of Smiths says
Yay! This makes me so happy! 🙂
The color gray is Wood Smoke from Glidden.
Andrea @ Decorating Cents says
It looks great. I love the gray, yellow, and chunky molding together.
Unknown says
Love it! You are so talented! I love board and batten, but I've just not become brave enough to tackle it! Maybe some day….
Leslie
kansasgirl1 says
This is really beautiful! I would like to have a bathroom this crisp and clean.
kansasgirl1 says
This is really beautiful! I would like to have a bathroom this crisp and clean. Thanks for sharing the tutorial.
Alesha says
Love it!! So much. =)
Cristin says
LOOKS AWESOME!! Cant wait to try this in our bathroom! As always, thanks for sharing all of your ideas with us!
Cristin says
LOOKS AWESOME!! Cant wait to try this in our bathroom! As always, thanks for sharing all of your ideas with us!
Anonymous says
Turned out great! One thing: the correct term is "quarter round" rather than "corner round" (because it's 1/4 of a full circle) — just thought I'd mention in case someone was looking for it at the store.
Anonymous says
Love it! What color yellow did you use on the sign? Finding a good yellow can be hard!
ChipperTracy says
This project is currently in the works for us, but already looks great for one wall in our tiny bathroom…we removed the bottom ledge trim of a window that is smack in the middle of our wall, and ran the ledge shelf straight underneath, which now makes the window look like it is built in and belongs there…the effect in our small bathroom is amazing….really opens it up…we love it!
ChipperTracy says
This project is currently in the works for us…we have a high window smack in the middle of our project wall in a tiny bathroom…removed the bottom ledge trim from the window and ran the ledge right underneath the window…bam…it has come together perfectly and the effect on the small space is amazing…thank you for posting your projects…we are finding so much inspiration on your site!