


DIY Wood Planked Walls Tutorial
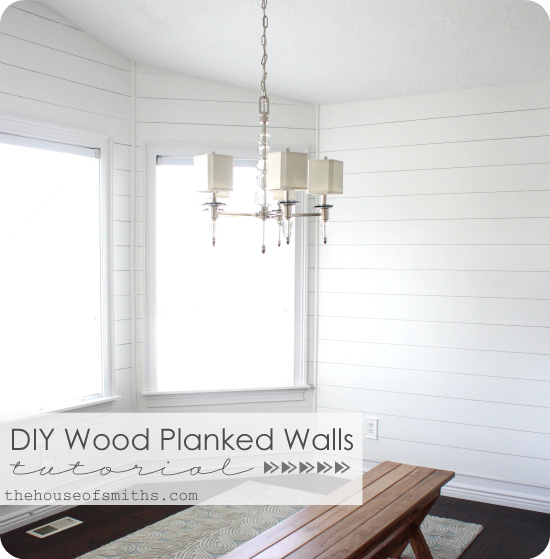
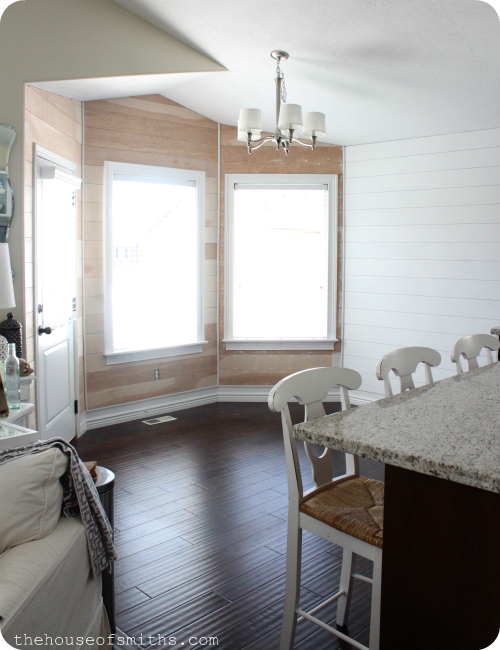
We’re continuing to make progress on our kitchen re-style, and have decided to finally embark on a project that we’ve been wanting to do for a while now; planking our kitchen nook in clean, crisp, evenly spaced, white boards. We’re finally done and LOVE the results, check it out!!!
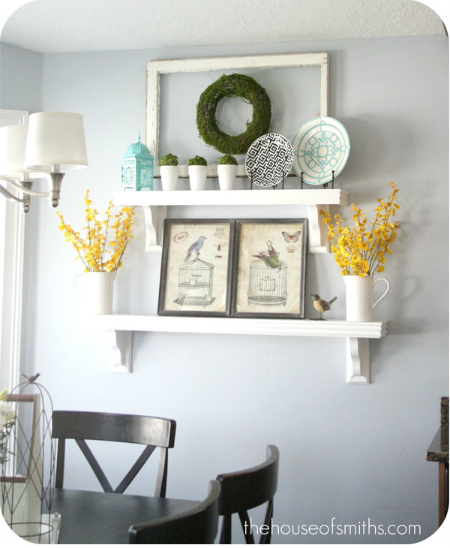
As I’ve mentioned before, we have absolutely loved our Ballard Design inspired shelves that we built for our kitchen and change them out with almost every holiday and season. They basically act as sort of a mantel, because we don’t have one.


That being said, once we started making changes in our kitchen, we knew that this wood planked wall project was going to be part of it too. Originally the kitchen nook was painted Upward by Sherwin Williams. It’s a REALLY good gray-blue and we loved it, but were ready for a change. My friend and fellow blogger, Sausha from Sweet Pickin’s wrote a great tutorial on this wall paneling technique not too long ago, so I wasn’t planning on posting mine in such detail, until I realized that we did a few things a bit differently; and also had a couple of tips and tricks of our own we wanted to share.
So, here’s how we did ours:
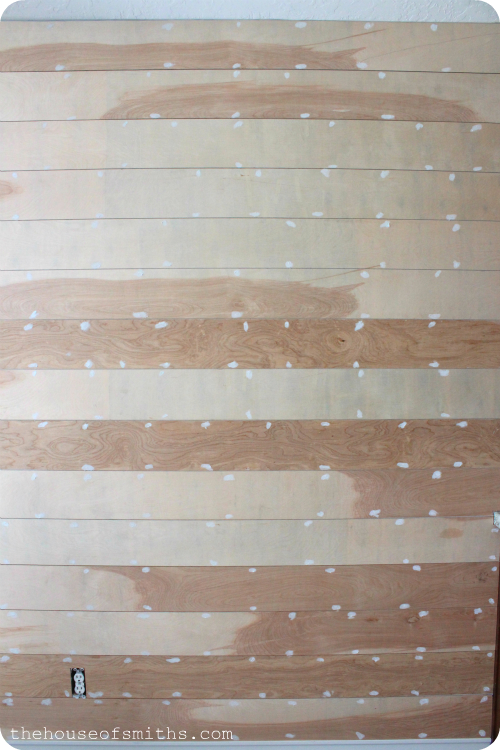
To get the wall prepared we took our shelves down, patched the wall, and then gave it two good coats of primer. Even though we were planking the walls we knew that we were going to have spaces between each piece of wood and didn’t want to take the chance of any blue wall showing through the slats later on. Looking back, I’m SO glad we did this because you COULD see through the gaps quite a bit.
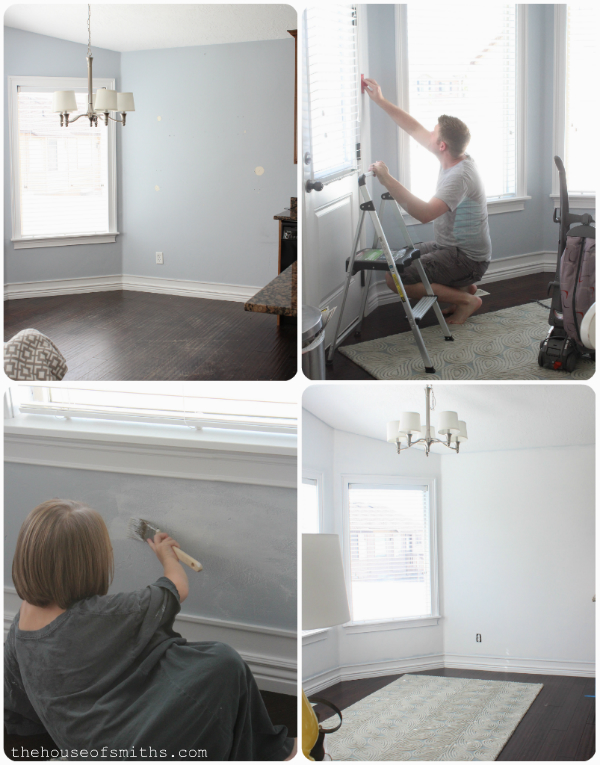
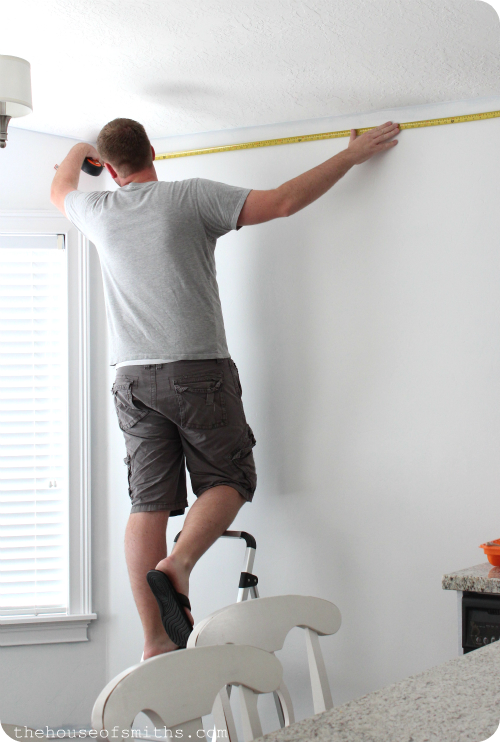
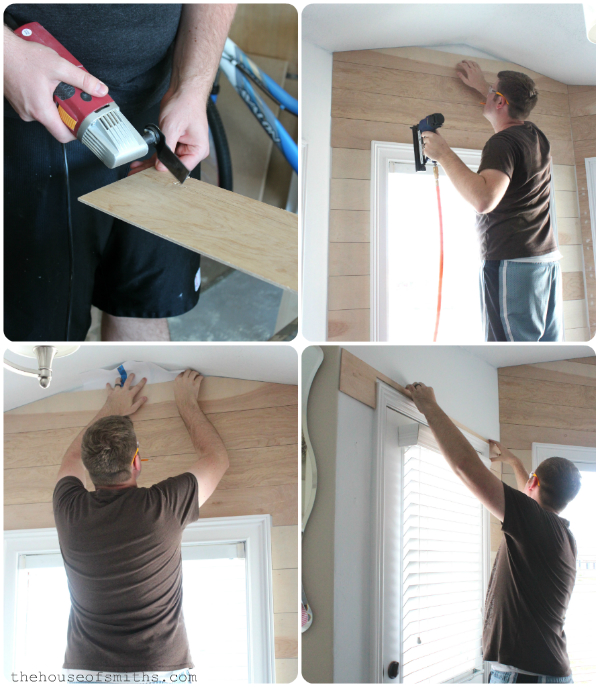
Next, Cason measured the walls to get an estimate of how much wood we’d need to get for the space.
Just like Sausha did, we went to Lowe’s and purchased about 4 sheets of the 4×8 paint-ready utility plywood and had Lowe’s cut them into 6 inch strips, length wise. We paid about $3.00 extra to have all the cuts made for us but it was WELL worth it! After we brought them home we quickly sanded down the edges where there were any splinters or rough spots from the cuts.

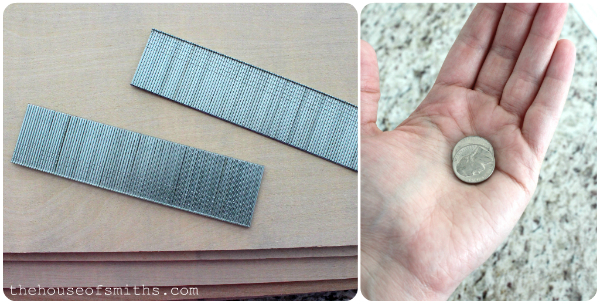
Then, really, the only thing we needed was a nail gun, finishing nails, a level and 2 nickles.
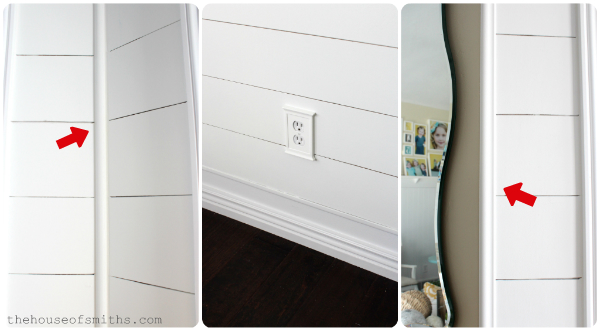
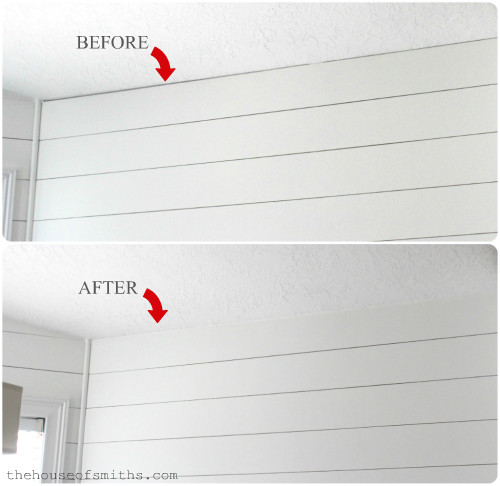
Because our ceiling (like most peoples, actually) isn’t level, we made sure the first board was completely straight and level with the wall, leaving a bit of an uneven gap along the top, that later we would simply fill in with white caulk. It’s important that your FIRST board is level, because if not, then your whole wall may appear lopsided or crooked in the end.
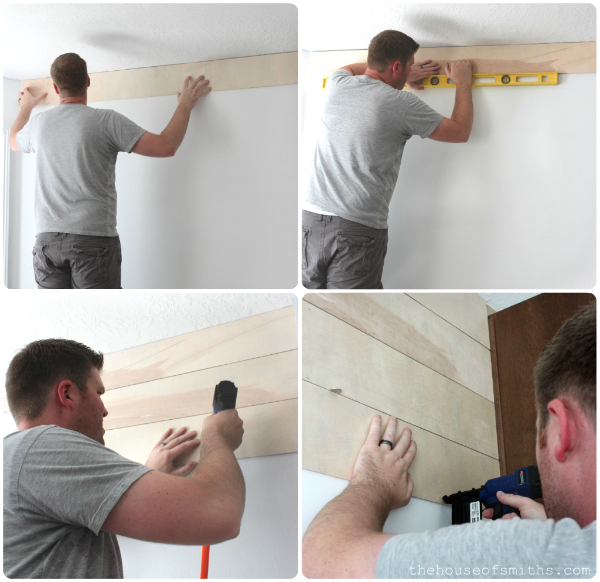
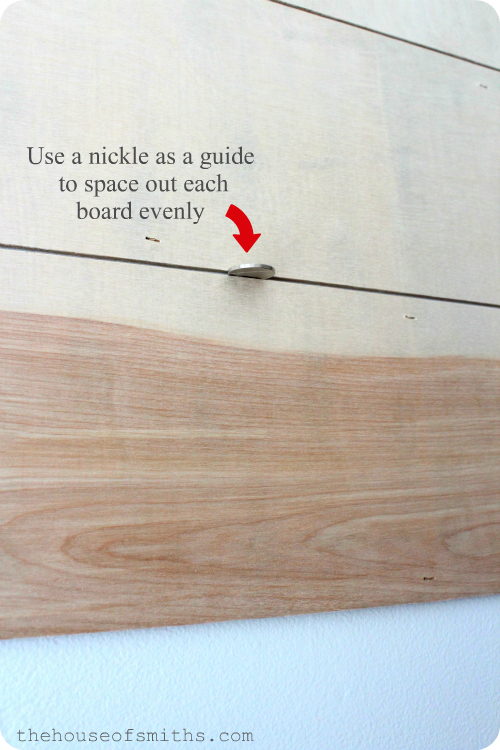
Once that first board was up, everything moved pretty quickly. We wanted our boards to be more uniform and evenly spaced apart, verses scattered. To ensure that we had the same space between each board we used a couple of nickles as guides and wedged them into the empty space, before we nailed up the next plank. It worked like a charm!
Just to make sure we were still on track and everything was staying straight, we used our level to check the boards every few minutes. Better safe than sorry, eh?
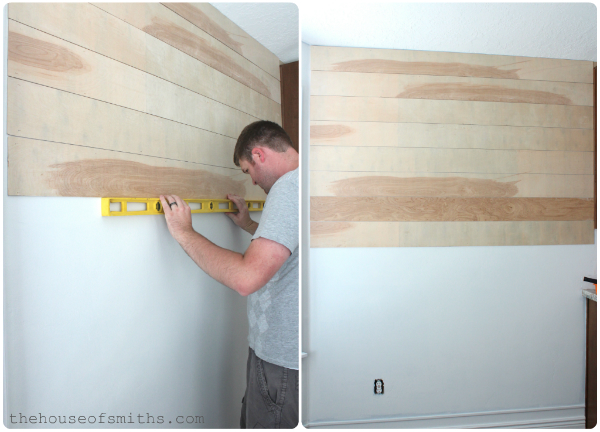
Our larger, straight wall was super easy and only took about 20 minutes to finish, but once it came to the walls where the windows and door were, things got a little trickier. To cut a few of the pieces into the shapes we needed, we used our multi-functional vibrating tool. We also used some computer paper taped together to make a template for the very top piece, so that we wouldn’t mess up, because that cut was extra tricky.
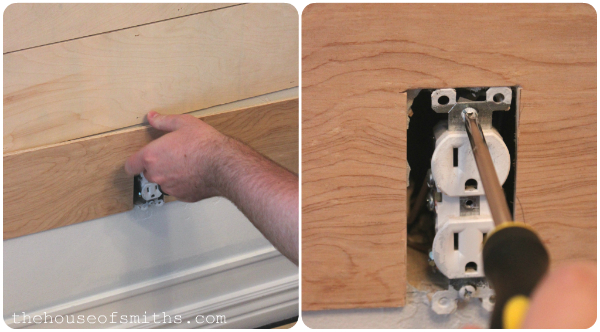
When it came to placing the boards around our outlets, again, we used our multi-functional tool to cut out a spot for them. Another thing that I thought might be helpful to know, is that when placing the board around the outlet it may sink the outlet in too much, so you’ll have to take a screw driver and unscrew the fixture a bit, to get it to pop out a little. This makes it possible for you to be able to place an outlet cover on it later.
Oh! And make sure to cut the power off before this step too. Metal + electricity = shocking results.
🙂
Once all the boards were up Cason went through with a nail setting tool and sunk in any of the finishing nails that were sticking out, so I could patch them.
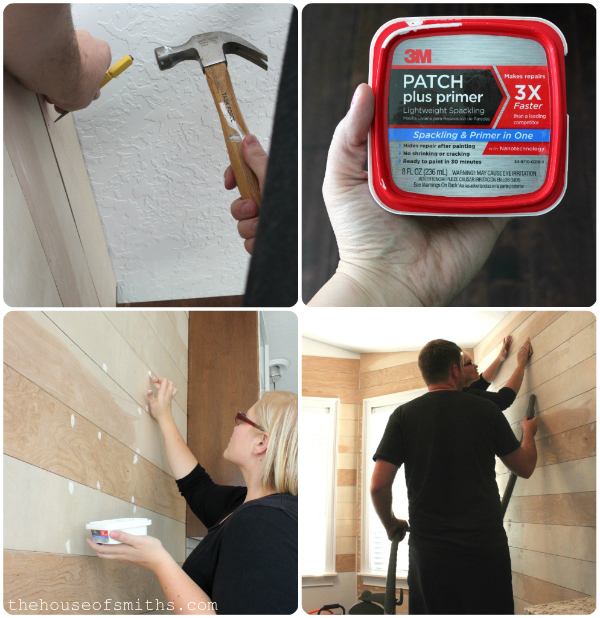
After everything was all patched up and dried, we took turns sanding everything smooth and holding the vacuum hose.
🙂
Super-fine putty dust flying all over is the WORST to clean, so we try to suck up the bulk of it with our vacuum first. We’re kind of DIY-clean freak-dorks that way. LOL
To finish off our vertical seams where our walls met up, we used a few pieces of quarter round. For the one edge near the door that divided the planked wall and the living room wall, we used a piece of finishing panel molding that had a lip underneath that snuggled up to the planks really well.
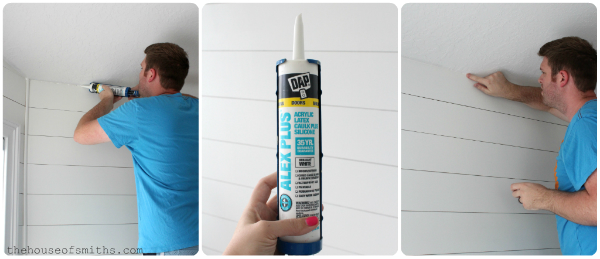
After everything was painted semi-gloss white, Cason went in with latex caulk and filled in any uneven gaps or seams that we didn’t want showing. It may not seem like a very necessary step, but I promise, it finishes off the whole thing really well.

We also changed out our lighting fixture to one that was a bit more modern and that had some crystal elements, to “glam-up” this space a bit more. We purchased it from Joss & Main a few months back, for about half the price it normally goes for. Score!
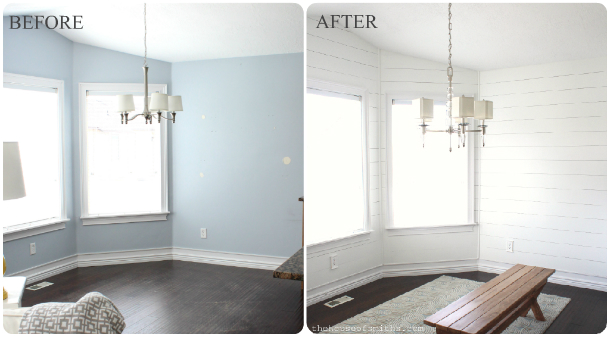

Like I said before, we LOVE the finished product and can’t even believe how much larger the space looks now that it’s all planked and painted white; we’re so glad we moved forward with everything and decided to do it. The whole project costed us about $50, but we had nails, paint, putty and caulk already. If you had to buy everything… I would say that you could do it for about $80 – $90 easy!
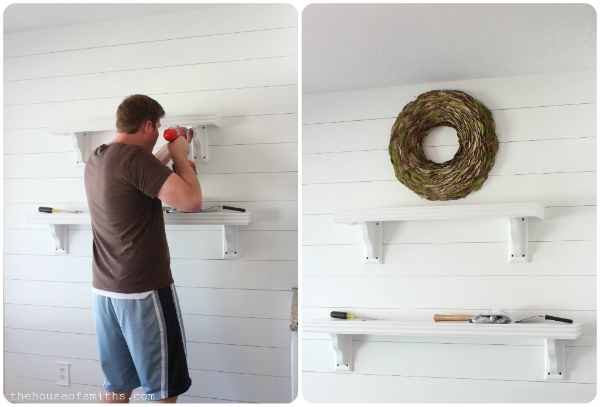
Of course after the building part of any project is done, MY favorite step comes in… decorating it! Cason was awesome and got my trusty shelves right back up on the wall as soon as possible, so I could start sprucing things up for Thanksgiving!
🙂
…stay tuned for that post very soon!


Natalie@Endless Crafting says
Love it! Looking forward to seeing your Thanksgiving decor!
Kenzer @ Interiors By Kenz says
Great tutorial! I was actually planning on putting up planking in the nook in our basement tomorrow. I wasn't planning on painting the drywall behind first, but I'm glad you said you did. Now I can avoid that mistake.
Your kitchen is looking great! I can't wait to see more!
Restyled Vintage says
that looks fantastic Shelley…what a great idea using ply cut down into 'planks' – so much cheaper than buying planks, love it!
xx Karen
Sherri M says
As with everything else you do…love it!
Crafty Texan says
Looks awesome!! With us living in military housing, I am so jealous, because I'm not able to do wall treatments like this. I however AM about to make your Ballard Design shelves for my daughter's room. Yay! (:
Celebrating Moments by Marcie says
I looks AWESOME!!!!!!!!
Celebrating Moments by Marcie says
It looks awesome! I def don't right now lolol
Also, love the comment "clean freak dorks" You guys crack me up! SO CUTE 🙂
Kim @ Plumberry Pie says
Beautiful! I love it! I can appreciate all the hard work to put it in…that is why it won't happen at my house. 🙂 It really is fabulous!!!
Amanda says
This looks absolutely amazing! I love that you did this and I can't believe how affordable it was! We're considering a similar treatment on our kitchen ceiling and I can't wait to get started on it. 🙂
Kelly Palmer says
It looks beautiful!
Chris Kauffman says
I love it . I think I need to do this somewhere in my new house.
Can I just share a great tip I got from a very experienced contractor…if you prime your projects that are to be painted before you fill holes you will get the very best result,most importantly wood, it prevents any shrinkage. The same holds true for stained projects , you should stain then finish coat THEN fill holes!!!
Just a little tip that I wish I had known earlier.
Chris
Carrie from Talking In Space says
Y'all did such a good job! Gorgeous, and I can't wait to see how you decorate.
Unknown says
Love, love, love your new walls. Can't wait to see the finished space!!
Genny says
Looks beautiful! You must feel so accomplished! It's such a good feeling to finish a project and have it turn out exactly liked you planned! Congrats!
Unknown says
Love, love, love your new walls. Can't wait to see the finished space!!
Anonymous says
Inspiring and beautiful. Thank you for sharing
Amber says
It looks fantastic! I love the contrast of the white walls with the dark flooring, also.
Ryan and Abby says
What would happen if you we're to try to take this all down, like if you sold it and the next owners didn't want it? I just always worry about something like this because I'm worried it would destroy the wall.
DaddysDIYgirl says
Love your blog! Beautiful!!
Abbey D. says
Shelley…this looks AMAZING. I'm so jealous! It's stunning and that new light fixture makes it even better. And on top of it all, I adore that wreath 😉 You guys never cease to amaze me with your eye for things. Well done, as always. Hugs, Abbey
Renae says
Love this so much. We did the same treatment in our entryway a couple of years ago. I have a question for you. Did you use your brush to do the cracks and then roll the faces of the boards? We had some troubles with goopy paint in the spaces despite our best efforts to avoid it. Thanks guys!!
Amy says
Looks beautiful! We did something similar to our powder room and get so many compliments on it.
Bethany@http://thislittleestate.blogspot.ca/ says
Looks great! Your space looks so much more open now, you're right! I love the contrast with your dark floors too. Fabulous job, you guys should be so proud of all of your hard work!! Xo
Unknown says
I love it too! What a great job and it totally transforms the look of your space! Have a great week!
Leslie
House on the Way
Anonymous says
You guys are hard working people ,and the result looks great
M says
Looks amazing! I love watching your house change and evolve!
Anonymous says
Wow I absolutely love this!
Kait @ The Jones Journal says
Oh goodness- I love this! I want to try it in my home…off to fetch the husband!
Monica @ CreativeGator says
Wow, it looks amazing! Now your holiday decor is really going to pop. Can't wait to see it.
Sheri says
Looks amazing!
Bekah says
looks great!!
This is a weirdish question, but do you think it makes the ceilings look higher or lower? Or nothing different at all?
I have been thinking it might be fun to do something like this in our bedroom (which is awful right now. Awful) but our ceilings up there are LOW. I dont mean 8 ft low, I mean 6.5 feet low. Its…ugh. Its a rental…I keep reminding myself. But anyway, the landlord straight up told us she doesnt care what we do to the house, and we take very good care of it, so I really dont think she would care if we did this in a room. But do you think the horizontal lines of the planks would just emphasize the squatty little ceiling?
Also – is there an award for the most longwinded comment?
Laci says
Love Love Love this! This is what I mean by attention to those little spaces I would never think of. It changed the whole space, You rule- I will need to copy this, someday 🙂
Anonymous says
I love it! Your kitchen nook is the perfect place for planked walls! So glad you are keeping the shelves as well!
Jill says
Yet another amazing tutorial! Your kitchen is looking really fantastic and I adore the planked walls. Thanks for sharing!!
Janet says
Beautiful!!! Thanks for sharing a tutorial, I'd love to do something like this in my laundry room.
Anonymous says
looks great!
House of Smiths says
We actually thought of this (because we change our mind so much, ha!) and that's why we chose to use finishing nails, instead of any adhesive. That way if we wanted to, we could just pull the boards off, patch up a billion tiny holes and try something new!
🙂
Anonymous says
Lovely, as usual. You two are amazing!
House of Smiths says
I think that anything painted white looks larger, but what if you planked the walls vertically, instead of horizontally? That way you could get the same cool look, but it would draw the eye upwards!
The McKSneds says
I love it! Someday maybe I will have a planked wall! I drool over pictures of planked walls all the time! But since we are renting my in-laws old house, I have to wait until I get my own home again. Thanks for the tutorial…I will definately keep those tips in mind. It looks awesome!
Anonymous says
I love this! I pretty much love everything you do! Also, random question not applicable to this post. What color of blue paint did you use on your pantry door?
Ashley says
Looks beautiful! I'm curious about a couple of things. Did your panels happen to line up perfectly spaced between your ceiling and baseboard, or was there some math trick invovled? 🙂 Also, where did you get those beautiful covers for the outlets? Are they paintable? Thanks for sharing! Love your new kitchen progress too!
Carrie says
Looks awesome!
shelley says
You two are nothing short of amazing! congrats on your 'new' room 🙂
shelley says
i second that… go vertical 🙂
Iuliana@Hip2Thrift says
This looks amazing! Definitely pinning this for when/if I have a house some day.
Megan @ Megity's Handmade says
DANG girl! This looks amazing! Still really love the shelf. And the wreath? Where did you find that little gem?
Lisa Joy says
For a removable option, I wonder if you could nail planks onto a piece of plywood and then nail the whole thing to the wall…you could do it in sections, then it could be taken down when you move and you could take it with you. Just a thought. 🙂
jackie jade says
What a great project – it looks fantastic!!
Beth says
I love it and want to do this in my master bath. I'm almost convinced I can pull it off. I need a Cason though *wink*! Pinning!
Desiree says
Did you have to paint each plank with a brush? How did you keep paint out of the seams of the planks? I'm getting up enough courage to do this and I want to make sure I get it right. Love it! Thanks for the inspiration.
Desiree
Heather says
Beautiful! I adore this space!
Unknown says
SO excited for your tutorial. The hubs and I are just about to embark on doing this to our 2 story fireplace wall! Your kitchen is looking awesome!
House of Smiths says
Hi Renae,
We actually just used a non textured roller for the planks and then if any paint got in the cracks, we used a putty knife to get it out. It went pretty fast though, because the non-textured roller doesn't hold gobs of paint that seep everywhere.
House of Smiths says
We used Crystal Aqua from Valspar 🙂
House of Smiths says
Hi Ashley,
By some tiny miracle, our boards worked out perfectly, down to the last one, but if it were me and I had a smaller board to fit in, I would want it at the bottom, instead of the top.
We didn't worry about any math at all.
The covers were from Lowe's. They are allen + roth brand… and I'm pretty sure you could paint them if you wanted to!
House of Smiths says
We found that cute wreath at Joss & Main a few weeks ago 🙂 bit.ly/VyXE6e
Hayley says
Love love this! I've been wanting to do a wall too, but my hubby is pretty difficult to get on board with me doing house projects. PS, what did you do with your OLD dining room chandy? I've been wanting a similar one for my dining room, and I live in SL County, so didn't know if you listed it on KSL or used it elsewhere in your cutie house.
Sarah says
Lovely!! I just love it!!!
Rachel :) says
Lovin this! Did you nail the planks into the studs? Or just the drywall? Been wanting to do this treatment on my ceiling, but my "ceiling studs" run the wrong way for the direction I want to do the planks.
Jennifer@ClassicStyleHome says
I absolutely love the planked walls. I wanted to do this in my living room, but between the beadboard and the wainscoting I've got to draw the line somewhere! Maybe in the next house…
Erin {Lavender and Lemon Drops} says
LOVE! It looks amazing and I'm obsessed with that wreath! Can't wait to see your Thanksgiving Decor 🙂
The Kimball's says
Love the new chandelier…where did you find that?
Liz says
Love it great job. I even liked it without the paint and just the natural wood for a more rustic look. I have even seen a planked wall painted different colors and stains that was awesome. I'll try to find that link and post it. Here it is. took me a sec. Different style more funky fresh. But I really liked it when I saw it. Wanted to do this in a house we were thinking of buying awhile back. designsponge.com/2011/06/before-after-salvaged-wood-wall.html
Renee V says
Good point, I would love to know what she thinks on this too!
Lisa says
Gorgeous! My hubby is not handy AT ALL so I'd have to sweet talk my dad into a project like this! Lucky lady to have Cason assist you!
Katie says
love, love, love it! Your kitchen is going to look amazing when everything is all finished!!
Hulet Family says
I love it, I wish I could do something like it I my house … Maybe some day. Just wondering what you did with your old chandelier?
Anonymous says
This is a wonderful space! How thick was your plywood?
Ashley says
Thanks! And how nice to avoid the math.
Emma says
It looks great. The chandy is so pretty.
Dacia @ Lemon Drop Life says
It looks fantastic!! Way to go 🙂
Liz says
Yes how thick was the plywood? I am thinking it would be great on my porch ceiling!! 🙂
Sara says
I would also like to know the thickness! We are planning on doing this but We cant seem to price it out for as cheap as you were able to do it!!
Sara says
Yes I would also like to know how thick it was!! We are planning on doing this but cant seem to budget it out for such a good price!!
Anonymous says
That is a great idea, the horizontal lines and you could paint the ceiling pale blue seem like sky. ??
Anonymous says
I like the horizontal idea also and you could paint the ceiling a pale blue to seem like sky. ??
Julie Chen says
OMG Shelley, I want your planked walls! 🙂 They look amazing. Such a big difference. I'm scanning our house for a wall to do as I type, while hubby slinks away and hopes I'll find something else to occupy my time. Love it. I'm so pinning you. 🙂 Thanks for the inspiration. x Julie
Lil Mama Stuart says
Wow, I can't believe that it was under $100!
Kate Riley says
Shazzam Shelley! Love this look so much and I spy a fancy new chandy, looking oh so chic! Excellent tutorial my friend.
xo
Kate
emily says
Lovely … I never would have thought of using plywood cut into strips. That is brilliant. Now I will do it to my boys' room …
Unknown says
I absolutely love it! This looks amazing and I fell in love with Saush'a kitchen so much a few weeks back that I told my Hubby we needed to plank something in our house….we decided to start with the hallway for now to brighten it up and add a backdrop for a gallery wall. Seeing two amazing ladies complete this project gives me even more hope that we can do it too 🙂 Thanks and again, it looks GORG-E-OUS! 🙂
Staci@asaltbox says
Thanks for sharing all your hard work with us. I love the way that planking can turn any ordinary space and make it look so much more custom. Your walls look amazing, you have motivated me!
Capturing Joy with Kristen Duke says
LOVE this, Shelley! I love the nickel idea, and your step by step is SO helpful! i am planning on planking the bottom 2/3 of my daughters room and can't decide if I want to do horizontal or vertical. Excited about the inexpensive plank option!
Positively Angel says
Looks great! So happy to see you kept your double shelves on the wall, I always look forward to seeing how you decorate them:)
Rachel says
I love this! I tried to do this in my bedroom after I saw the parade of homes house you did, but I feel like the boards were way to thick. I wish I would have seen this post first because this is much more of the look I was going for. So lets say you wanted to rip all that planking out, hypothetically, is there any way to do it with out destroying your walls?
Jenn Crawford says
Love this! What color paint did you use?
Jenn Crawford says
I love this! What color paint did you use? Also, our ceilings are a light beige color and the area I want to do this is open to the rest of our our house. Do you think I could do a wall like this white and not have it look weird with the beige ceilings (painting the ceilings in the kitchen would mean painting the ceilings throughout the rest of the house)…
Rustic Goods says
This comment has been removed by the author.
June @ Coffee Under The Umbrella says
Hi – I'm trying to pin this, but Pinterest is telling me it's spam! 🙁 Don't know if it's just me if you're aware of this…
Kate Finnegan says
Shelly! LOVE your work! Very insperational. I want to do this on a long wall, what are your thoughts on when there have to be seams? Any thoughts or ideas are greatly appriciated! Looking forward to your next project!
chadandsara says
We just finished our planked wall!!!!!!!!! Love how it turned out! Thanks so much for your tutorial! 🙂
niftythriftymomma.blogspot.com/
Keep Home Simple says
Thank you so much for your planked wall tutorial!!! It was exactly the inspiration that we needed. We didn't end up doing a wood planked wall yet (but we do plan on it in the near future). Instead we applied your tutorial to our ugly basement ceiling. It made a world of difference! You can check it out our ceiling here:
keephomesimple.blogspot.com/2013/02/basement-family-room-part-iii.html
Again, thank you, thank you, thank you for all your wonderful inspiration!!!
~Robin
Brandi says
I really love this look. We did something very similar in my son's room. I've been thinking about doing your version in the laundry room. Thanks for sharing your tutorial. I like your wreath in the last pic! Do you mind sharing where you purchased it?
Michael and Emily says
Since you didn't paint the planks before you put them on the wall, can you see the unfinished edges? Or is it a small enough gap that you can't tell? I LOVE this look and am going to do it in our nursery. Great job! I love your blog.
daniela says
I absolutely love this. We are going to do this in our office! Thanks for the GREAT tutorial.
xo
Daniela
iputabirdonit.blogspot.com
Unknown says
We are the cheap removalists Melbourne trusts! … If you're moving house and
want a stress-free and cheap furniture removals process, our removalists are
here …
"Click Here"
Cheap Removalist
Amy K says
I love this tutorial and used your link and photo when talking about our future home. Maybe I will get to use it.
Unknown says
I will definitely tell dad to read this one. the results are lovely! Can't wait for my room to look like this. 🙂 My dad owns a cheap furniture removals business so i bet he has an idea how to do this specially with the guide that you show here.
sher says
In the middle of planking our wall using your tutorial….the finishing nails went right through the board and sunk deeply into the wall…oh boy…I guess our nail gun is either too powerful or we have the wrong size nails. Could you tell me the gauge of the nails you used? Thanks!
sher says
In the middle of planking our walls using your tutorial. Our nail gun shot the nails through the boards and deep into the wall (and they are somewhere deep in the drywall, I'm sure never to be found again, haha)….either our gun is too powerful or we are using the wrong size of nail. Could you tell me what gauge your nails are? Thanks!
Dung Tran says
hi , i have a question about the plank you used Is it plywood or something ?
you're awesome !!!
Dung Tran says
This comment has been removed by the author.
Rainie says
Hi, this post was so long ago so hopefully you're still replying to comments:-) What would you recommend if we wanted to do this to a longer hallway type wall that is larger then 8ft wide?
lainewilliams says
How thick is the plywood? Thanks!
karahilliard79 says
I'm dying for more info on the new light! I LOVE it! Please tell me you remember the name…. 😉
Unknown says
This look amazing! I am using this as a guide for adding a wood planked wall in my daughters bedroom. I just hope it's as easy as you made it look 🙂
{deflated notions} says
I notice a lot of people have asked how thick the planks are… I cannot seem to find " 4×8 paint-ready utility plywood "… can you help?
Anonymous says
Would you recommend doing this on a ceiling?
Anonymous says
Would you recommend doing this on a ceiling?
Kat says
THis looks amazing, and when I have my own place want to do it 🙂 Question: how much was it total for supplies? and how long did it take you? And although the wood is very thin, did it make the room seem small at all?
Unknown says
My daughter and husband want to do this on their basement walls due to cost of drywall. The walls are studded out and insulated and covered with visqueen poly sheeting. Do you thim=nk they will see this thru the gaps or do you think they could use a penny instead? Do you think we would have issues with warping due to no drywall? Any suggestions would help! Thanks!
Unknown says
I love this and did a similar project in my dining room. Now I want to plank another larger room but I'm torn on how to arrange the planks on the walls that are longer than 8ft. For example, I have one wall that is 9.5 feet so do I stagger the 1.5 foot pieces alternating ends on each row or do I just put them all at the one end and have one vertical seam? What do you suggest and did you have any walls that were longer than 8feet? Thanks in advance