


Scattered Herringbone Decal in our Shop + DIY Framed Art
I’m stoked to finally be sharing this new decal that we have in our House of Smiths Design Shop now; the Scattered Herringbone in large and small! Today I’m going to share this super awesome, easy DIY framed art tutorial with you guys, that I made using our small herringbone decals, AND a discount code for our shop…

but first, I have to show you how Jen’s wall looks!
We covered an accent wall in her master bedroom with the large scattered herringbone decals, and it turned out so fun! It took about 18 sheets, two different ladders and even Cason’s help/height…but we got it done!

If you were following along with us on Instagram, then you know we posted a teaser about working on a project with Jen for her amazing 30 day bedroom makeover a few weeks back, and we couldn’t show you our fun decal wall reveal until now, because we had to wait until her bedroom was all finished.
I’m happy to report that Jen won the room makeover contest and I couldn’t be happier for her, you gotta go check it out!

Okay, now onto our DIY framed art tutorial.
Large or small, when you order a sheet of the scattered herringbone decal, it will come just like this. In a rectangular shape, with three layers. Backing paper, vinyl and transfer tape. I’ve left the transfer tape off the gold decal so you can see what it looks like without, but the white has it.

When you get your decal(s), you’ll want to trim around it, like in image #1. This will help you to see exactly where your placement will be when you apply everything. I used a large Ribba Ikea frame for my wall art, and it was too small to fit two full decals, so I just cut one of my decals down the middle.
You WILL have to cut straight through the middle of some vinyl, as I’m showing in image #3; don’t sweat it! That’s what’s so great about this design, you can mix up the layout however you want, it’s totally random and you WILL have to piece things together, so get creative!

Once you’ve got your vinyl where you want it, you’re going to use some painters tape as a hinge to keep the vinyl in place while peeling the decal back, remove the backing paper, and then smooth the decal down onto the glass (or wall).
NOTE: Vinyl will adhere very quickly to glass or super smooth/shiny surfaces, so recruit a helper, to make sure your application is easier and free from excess folding or wrinkling.
Once your vinyl is down, rub firmly over the transfer tape with a spatula/credit card/vinyl squeegee to adhere the vinyl underneath, and then remove the transfer tape layer.
If you DO have bubbles or wrinkling in your vinyl, don’t freak. Vinyl isn’t as fragile as you think it is. You’ll want to be careful with it, but it does have a lot of give and can be reworked if you simply need to lift up the edges or a piece to smooth out a wrinkle or release a bit of air that’s creating a bubble. This herringbone design is especially easy to do this with.

Once you’ve got your first decal down, just move your other pieces around, putting them wherever looks best, and come up with a pattern/design that you like.

For the pieces that hang off the edge, just use an X-Acto knife to trim off any excess before peeling off the transfer tape.

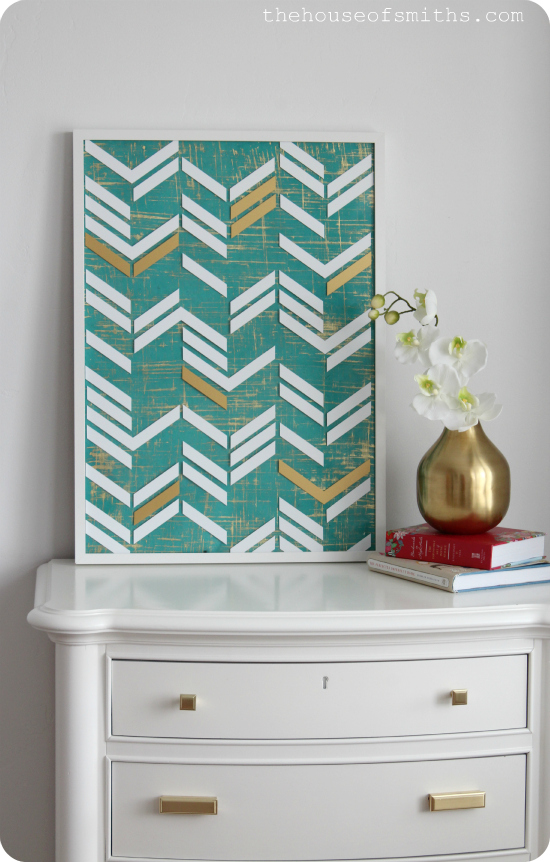
For this size of glass (about 20×27 inches) I used three sheets of the small white scattered herringbone (with a little left over). You can leave the white just how it is, or add accents of a different color, to make the design really pop. Of course, because I’m obsessed with gold… I went that route.
🙂
I just placed some random pieces where I thought they would look good, and then removed a piece of white vinyl and replaced it with a gold one instead. Easy-peasy!

If you have a pretty painted wall, then you can stop here, call it a day and just hang this beauty, it’s awesome as is! If you’re someone who rents, doesn’t want the color of their wall to show through the glass in the frame or needs to add MORE color to their existing rooms decor, hit the back of that frame up with some wrapping paper!

Any kind will do, but for this project I was looking for something really special, so I went to Paper Source to snag a few sheets of their high-end designer paper that usually runs between $3-$6 a sheet. Maybe a little pricey for a present, but perfect for a piece of art!
🙂

Awwwww yeahhhh…

I’m planning on putting this in our basement to compliment our peacock blue rug and gold accents that are already down there, so this blue-green and gold paper is perfect… BUT, you could totally switch it out for holidays or different colors if you wanted to later.
For those of you purchasing the large scattered herringbone decals, and placing them close together, here are some quick tips below.


Right now we’re doing a little sale in the shop for this week only, where you can take 20% off of any order over $20.00 or more, with the code “20OFF20“
(must use all caps and enter code at checkout in ‘discount code’ box. Sale will end 8/31/2013)
So even if you don’t need or want the scattered herringbone decal, you can still get a great deal on some of our other popular products, like mixer decals or pantry jar labels!
🙂

Happy Creating & Decorating!


Unknown says
Im so sorry if I completely missed this, but in order to use the same sized from, how many sheets should be purchased? Thanks…this is beyond cute!
Unknown says
Im so sorry if I completely missed this, but in order to use the same sized from, how many sheets should be purchased? Thanks…this is beyond cute!
Unknown says
I apologize if I completely missed it…but in order to use that size frame, how many sheets should be purchased? Thanks! This is beyond cute!
jeff says
Thanks for helping me with the wall. You are just amazing and I am obsessed with the herringbone art you made. So pretty!
oxox
Rissa says
I LOVE this! Your wall came out perfect and the picture is so cute…I may need to take a look at your store after this 🙂
Good work!
– Rissa @ RissHomeDesign.com
Katie says
Super cute Shelley!
Lindsey says
Wow! This is seriously amazing!
Michelle says
Wow that wall turned out so great!
Anonymous says
love it. I am in the process of filling my walls with DIY art and something like this would be awesome! Thanks…
Kenzie says
This is beautiful! I'm not brave enough to try this on the wall because I change my mind too much, but the framed version is perfect! Great idea! I'm really glad I found your blog 🙂
Capturing Joy with Kristen Duke says
That art looks FABULOUS!! Love the blue paper you chose for the back, too;)
Denissa says
OMGoodness I love this!! Okay I need to order 🙂
Anonymous says
I LOVE THIS!!! Thanks for sharing!! Brilliant!!! I need to order this too! 😉
I may do an art piece for my powder room or maybe the wall behind my bed …hmmmm
Julie
Powder room:
julieloveshome.wordpress.com/2011/05/09/yellow-spring-time-powder-room/
Bedroom:
julieloveshome.wordpress.com/2012/01/17/bedroom-story-something-from-nothing-the-wing-back-chair-bed/