


DIY Creepy Halloween Toe Pincher Coffin Tutorial
Alright, so I know I said I was ready for Fall decor, but typically I decorate for Fall and Thanksgiving time together, so at our house Halloween decorations always come first, and if you’ve been a reader for a while, then you know that I also like to try and do something new or a little bit different for each holiday every year.


This year I’ve been hovering around this sort of art deco type feel with my Halloween decor. You know, the geometric lines and contrasted colors; a bit ‘Great Gatsby’ if you will, and of course, I’m working on adding a few touches of gold as well 🙂 I have most of my decorating done, besides a few finishing touches and I realized that I had a lot to share, so I thought I’d break it up a bit over the next little while, to show you all the details and step-by-step better.
Our first little DIY project was this creepy, stained, toe pincher coffin. I wanted something on my shelves that was different this year; not a frame or regular board with a saying, so when Cason mentioned a tall tombstone or coffin leaning up against the wall, I was sold!

Here’s How we did it:
We used a piece of 1/4th inch thick birch plywood in a 2x4ft size and sketched out what we wanted our toe pincher coffin to look like. We ended up going with the below measurements. 6 inches for the three top portions, 11 1/2 on the longer sides and 4 inches at the bottom. Cason figured out that the points towards the middle met at about a 130 degree angle.

Once that was all drawn the way we wanted, Cason got out the jigsaw, his new clean wood blades, so that the cut edges would be less slivered and rough, and got to cutting out the coffin shape. Once he was done he just did a quick once-over on each edge with some 100 grit sandpaper to make everything ultra smooth.

To finish off the coffin box we just cut another piece the same as the first, and then used some of the pre-cut wood at Lowe’s (that you can find below all the regular standing wood) and cut them to fit each side of the coffin shape.


We stained all the individual pieces with Cabot’s Aged Leather, premium wood stain + sealer in a gloss finish and then let them dry for a good 20 minutes or so.

Once everything was dry, we simply hot glued all the straight pieces to the top of one of the coffin cutouts. Yup, I said hot glued. If you’re feeling like you want to figure out a few angles on the edges of those 6 pieces, get a pin nailer out and make this coffin a bit more legit… go for it! But we weren’t in the mood, and hot glue worked awesome. ha!


With the top part of the coffin I applied a vinyl decal that I designed.
“Hist & Hark, Draw close and Tremble, ‘Tis this Night that GHOSTS Assemble”
You can get one for your self in The House of Smiths Design Shop. I added some natural colored spanish moss, a couple of creepy little skeleton hands that I found at the craft store and bent into shape a little…
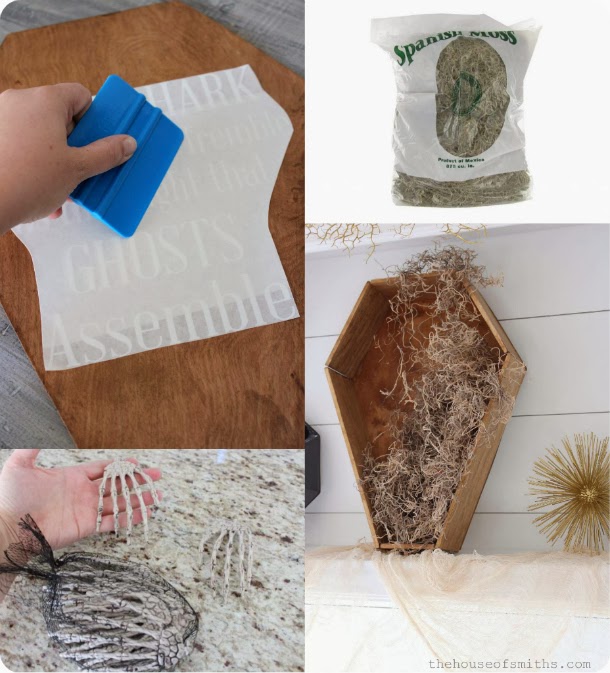
and ta-da, it’s done!
Cason forgot to glue one of the sides to the coffin at the top, so it popped of a little when we stood it up, and it wasn’t until my neighbor came over and pointed it out, did I even notice it, BUT she said: “Oh, that looks super cool, like he’s really breaking out of there!”… soooooo, we pulled that piece of wood off just a little more and left it just like that! 🙂

As I’ve said before, I’m not into bloody, ‘make-you-feel-gross’ or disturbed kinda Halloween, but more the unsettling, spooky kind that just sends a small chill up your back. This coffin, with the hint of maybe a corps coming out of it is definitely right up our little, scaredy-pants family’s alley. ha!
I’ve got more to come hopefully this week and definitely next, so keep your eye out! And if you want to get to making this coffin, or just want to have the vinyl lettering for an 8×10 frame that you can back with a cool piece of halloween paper, head on over to our shop and go snag one for yourself.

psst… a little birdie told me that the 20OFF20 code still works over there, so if you spend $20.00 or more, plug it into the discount box before checking out for a little extra savings 😉


E.P.Dallas Design says
Wow! You are very talented! I hope to do a lot more decorating this Halloween. Keep the ideas coming!
SHOP ~ EPDALLAS~
etsy.com/shop/shopepdallas
Unknown says
Super spooky, love it!!
Unknown says
This is cool.
Design_Fluff says
I love this project and the wording you added is perfect! I'm not that into blood and gore halloween, either. Just a little spook.:) Have a great week!
Gwen, The Makerista says
Very cool! Love the hands sticking out!
Katie says
Ahhh! I love this more than words can express. Halloween is my favorite time of year to decorate! Great job on the little coffin!
Crystal says
That's super creepy!!! My daughter is decorating her first apartment super scary and this would be perfect for it!! Thanks for the tutorial!! Love it!!
Carrie says
Cute & clever coffin
Ronda Batchelor says
Wow my clamps and my comment all in the same post! LOL But really it looks good. I might have to copy your coffin after I finish my other million projects.
Shannah @ Just Us Four says
That is amazing! The perfect DIY project for Halloween! Thanks for the share!
Laura S Reading says
This is so cool. I love when the whole family gets involved.
I would display it with a tiny speaker and some "interesting" (or disturbing )sounds.
When company came over, maybe add some dry ice behind it to create a mist…
Please share this on Wednesday with my Haunted Humpday friends!
Unknown says
This is such an incredible tutorial! Really, REALLY cool!!
I shared it with my readers on my blog, I loved it so much! betterbeedaily.com/around-the-beehive-9-24-13
Emily says
That's sweet! I love the creepy-but-not-gory look too and the bits left to the imagination is great.
Emily says
That's sweet! I love the creepy-but-not-gory look too. It leaves more to the imagination.
Kara says
This is awesome Shelly! My boys would love it!