


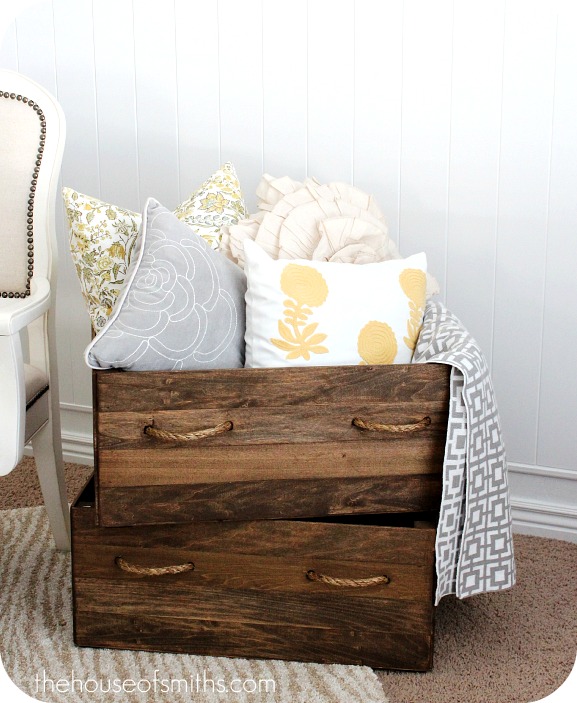
DIY Homemade Vintage Wood Crate Storage Boxes

We’ve been really busy around here, working on all of the small projects that complete the BIGGER projects that we are excited to show you soon! One of our projects came to a screeching halt when we realized that we needed some very specific sized storage boxes for something. Silly us, we didn’t think to build our project around an existing storage box or container, so we had to improvise and come up with our own solution.
We knew for these storage baskets/boxes we wanted a really unique, rustic, vintage look. We checked around online for something that would fit the bill, but everything was either too small or too expensive! So I had the idea of whipping up a few vintage looking boxes on our own. Here’s how they turned out!
And this is how we did it!

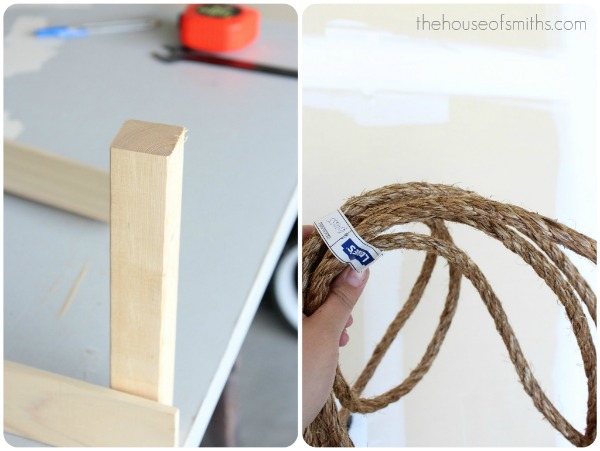
First, you need to visit your local Lowe’s home improvement store. They have these fabulous pre-cut boards in all different sizes that we use for TONS of projects.
These are some not-so-great iphone shots, but I wanted to show you exactly where to find them, because I get asked ALL the time. They are in individual little slots BELOW all of the other standing wood. They are easy to miss, if you don’t know what you’re looking for.
(hence the grainy visual, here. ha!)

We decided to stack the crates 4 planks high. So we picked up 16, 22inch planks for the fronts and backs, and then we bought some longer 3ft planks that we could cut, for the sides of the crates. I think all of this wood cost us about $45 or so dollars. Normally we would try to find wood that was a bit less expensive, but this wood is REALLY light, and our kiddos will be accessing these boxes a lot, so we wanted to make them easy for them to pull out.
(please don’t mind the crazy mess, known as our garage/workroom. gah!)

We also picked up some $.47 cent a yard rope, a piece of this small square board ($1.97) to put inside the corners of our crates and a thin piece of plywood ($8.00) for the bottoms of the boxes.
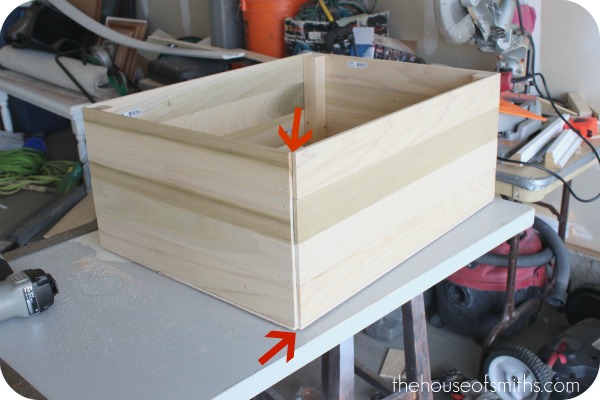
We didn’t have to do much cutting, because the front of our crates were going to be the same size as the smaller pre-cut boards. So we just cut the small square piece for the corners at about 9.5 inches and started nailing away, with our finishing nails.
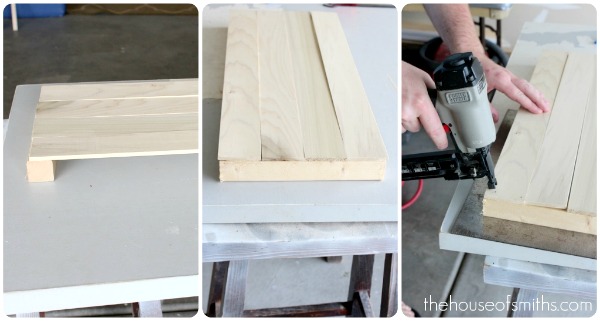
There really was no science to this process, and remember, it DOES NOT have to be perfect. In fact, you don’t want it to be! These are suppose to look old, used and “vintage”! So it’s okay if everything isn’t totally square or lined up perfectly.
After the front and the back of the crates were built we started in on the sides. We wanted a rectangular shape so we made the sides a bit smaller then the front and back measurements. About 18 inches.
Nailed those ends into the square corner pieces, and you have a four sided box!

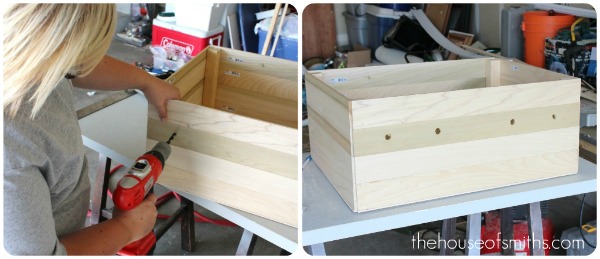
Next, we took our box, set it on top of a piece of plywood, drew a square around the shape and then cut it out to make a simple bottom that would be the perfect fit…
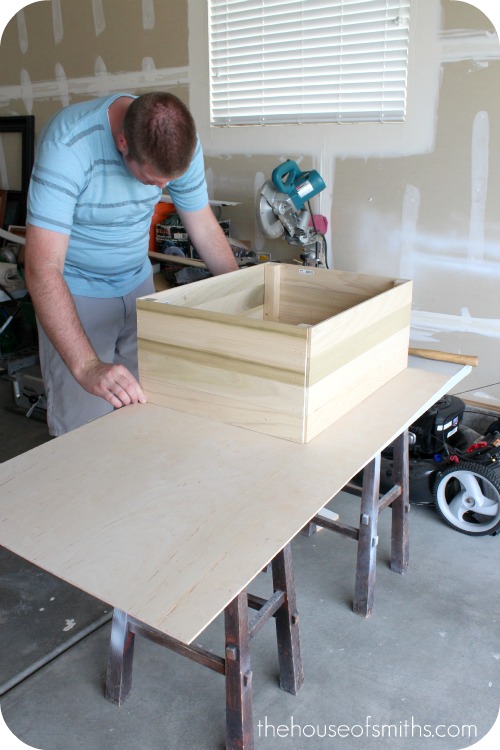
turned the box over, nailed the bottom to the 4 square posts, and you have a completed box!
So SIMPLE!
As you can see, we didn’t overlap the planks, because we wanted to give the box a little more character with that extra groove. We also used a little saw and edged out the plywood on the bottom, to accentuate the notch, so it wouldn’t be completely square. And we didn’t worry about filling nail holes or doing much sanding, because all of those nooks and cranny’s are what makes these crates have lots of “personality” 🙂
Next, I took a large drill bit and drilled four holes in the fronts of each crate for handles.
I measured mine at about 3 inches and 8 inches in, from the side of the crate.
After I drilled the holes Cason went in with the rope to make sure that they would be big enough to get the rope through easily. After we made sure that the rope worked well, I took them out and started working on sanding the boxes with my palm sander. Sanding only took a few minutes because the pre-cut wood is already perfectly smooth. (that’s what we love about it!) So basically I just sanded all the corners to give the crates a more finished, worn look.

Now for the wood staining process.
This was probably the most frustrating part of the ENTIRE project. I have NEVER STAINED ANYTHING before, and although I knew it was really easy and fool proof, deciding on a color of stain wasn’t.
I went through two different choices before I wound up with my perfect color.
First I tried Ebony stain, hoping to get a more grey finish, but wasn’t really diggin’ the look. Then I decided that a more natural look would be nice, but alas… it was TOO light and “natural looking”. ha! SO by a stroke of luck I eyed a discounted can of Early American stain from Rust-Oleum, and I LOVED it! So armed with some super sassy gloves and a cheap little paintbrush from the dollar store… I was ready to go!
(oh wait… they don’t sell “super sassy latex gloves” at YOUR home improvement store? hmmm… weird.
I’m sure you could probably just use regular latex gloves too. hee hee)

Once I got going my staining process was simple and really, staining is probably the EASIEST thing to do ever! All I did was brush it on with my paintbrush and then after I was done with a section I used a dry cloth to wipe of any excess stain.

After that, I added my rope handles and I was done!
Super simple, large, customizable wood crates for under $30 each. I’m sure that if you wanted to make smaller ones that you could get an even better bang for your buck too. But being that these needed to be quite large AND lightweight for our project, we thought this was a pretty great price, for getting exactly the look we wanted.


I’m excited to show you the permanent home that these crates will have soon 🙂
I can think of about a million places that I could use more storage crates like these. It’s SUCH a great option for all sized spaces, and costs about the same as your traditional run of the mill basket that you can pick up at your local home decor store. Also, think of the possibilities…
You could add a cool stencil and then sand it a bit to jazz up the front or sides, some decorative hinges, or paint the crates a fun color and add some pretty pulls for a little girls room!
What do ya think? Could you find a way to use this simple planked box tutorial to build a crate of your own, for a space in your home!?

I’m headed out to The Creative Connection Event tomorrow in Minnesota, and I’m so excited!


hcrjfrandall says
Awesome! Great idea! Can't wait for my hubby to make some 🙂
Unknown says
I have been looking for a "weathered" stain for months!! Glad to see you tried the Ebony… I had planned on going that route, but looks like it doesn't go very grey… Your boxes rock though!
Unknown says
This is so cute and clever. Good thing I am the handy one in the house!
Sarah says
I love these! I could see something like this in my home!
Susan says
That is such a great idea! I love it! Makes me think about where something like that could fit in at our house!
Ingrid says
i love this! i am going to be needing storage in our new house for both of my sons' rooms 🙂
Misty-Ann says
Gorgeous!!!
Love the idea.
Might just have to make the hubby nail/stain for me so I can put some under my bed! The baskets aren't cutting it anymore.. LOL
{hooked on hickory} says
that's an awesome tutorial! looks nice and vintage! i could see these working well for toys in a play room and/or nursery! love!
ashley {hooked on hickory blog}
Schnelle says
wow they look great! What a good idea.
Mik says
I've been following your blog for a few months and I have to say, you're a creative genius! I absolutely love the crates! Thanks for sharing.
Andrea says
these are awesome! I love the stain and the handles. I can't wait to make them…I mean get my hubby to help me make them 🙂 I am thinking of making a couple for toy storage for our living room (maybe put some casters on the bottom so the kids don't drag them across the wood floors).
thanks for the tutorial, it was really helpful.
Unknown says
Look at you. Too cute for words!!!
someoneinmind.blogspot.com
Valerie says
Whaaa?? I am AMAZED! I thought for sure this was going to be way above my skill set. I can't wait to find a use for this-somewhere- in my house! Filed at thecraftersfilebox.com.
Thanks for sharing!
cherished bliss says
I love the color of these! Simply stunning!
cherishedbliss.com
Classy Clutter says
Shelley! I LOVE IT! I could totally use a long one on against the my boy's room wall for their toys!! I just used rope handles on their dresser! I have been having a rough day and was so excited that you posted a project today! LOL HofS's and Pinterest save the day again! Thank you!! 🙂
xoxo, Mallory
Bud & Kim says
Adorable!!
Kim says
They look amazing! I love the way they turned out!! I'm absolutely filing this one away.
buddiegirl says
Those crates turned out great. I really like the choice of stain and the way that each plank absorbs the colour differently. It really adds to the rustic appeal.
Karie @ The HoB says
Love it! Thank you!!
Allison {A Glimpse Inside} says
They look fabulous!! And I love the pillows and blankets that they hold as well. Great job! 🙂
Elaine says
awesome! you and your hubby make a great DIY team. Can't wait to see what they are used for in the end 🙂
Unknown says
Super cute! (As usual)
Anette Willemine says
What a great idea! 🙂
I love you blog by the way!!! So inspiring!
Wishing you a wonderful day!
♥
Anette Willemine
(Norway)
Dzign by Jamie says
very nice! I love the idea and think those would be great in my work room. And hubby could even use some in the garage!! Thanks so much.
Mel says
Thank you for the instructions. I think you just may have just sold me on what to make for friends this Christmas – I can totally personalize each of them too 🙂
Karen says
These are awesome! I've been looking for something similar.
Thanks so much for the tip about the precut wood.
To The Moon and Back says
OMG! These look fabulous! Of course I can think of 199 places I could use them. You guys are amazing!
holly h. says
Wow!!! This is so cool. If I had just an ounce of your creativity and craftiness, I'd take it! Keep up the great blogging 🙂
Deneen says
Right on time. I've been searching the Internet and Pinterest for a good wood crate tutorial. I want to make a small bookshelf with wooden crates to put under the entry table. I've read quite a few wooden crate tutorials. This by far is the best one. Can't wait to see where you put these babies.
Jordan G. says
I love your crates! My husband and I just stumbled upon some wooden crates at our local thrift store, and we're still debating how to use them in our house. Seeing posts like yours gives me confidence that we made the right call when we bought them!
thehappyhomebodies.com/2011/09/thrifting-adventures-crate-shelving.html
Anonymous says
LOVE these- they look amazing!
Erin S. says
That is such a great idea, and I really loved the stain color with your accessories, etc. Thanks for sharing!
Christina says
Totally! Love these!
xo
Jolanda says
Please tell where you got the pillows from!? I just LOVE them!
Lyndsey says
LOVE this!
Alicia@Thrifty And Chic says
Those turned out beautiful Shelley! Totally jealous 🙂
Alicia @ thriftyandchic.com
Maria says
I am showing my husband this post:) LOVE!
Anonymous says
I love the tutorial and they came out lookin great. I love the look mixed with the colors. So pretty.
Wanderer says
I love them Shel! Someday I will have a house to decorate and use your awesome ideas!
K.C. and Sally says
I absolutely love these! I am also in love with the pillows and the throw you have in them. Would you be willing to share where you snagged the them? Thanks!
Becky says
Fabulous tutorial! Love the accessories in the crates as well.
LoeLaLoep says
This is amazing! I love the crates and definately will make some, too. Thanks for sharing 🙂
Unknown says
These look great… and you are soo cute btw 🙂 I'm thinking of making something like these for under-the-bed storage- putting them on wheels!
Michelle R. says
Quick question: Did these supplies give you enough for just these two crates, or did you have enough left over to make more crates? (Trying to do some quick price calculating in my head…)
Kandlestix:Home Design says
Stunning! Would you believe that I have been hunting for the same type boxes for my living room? It's like this blog post was meant for me!! 🙂 They look amazing, thank you for sharing! I am leaving very inspired.
Kandlestix Home Designs
kandlestix.blogspot.com/
amanda says
These crates are fab! Question, do you ever do the tool part yourself on these projects? My husband is not handy so if I am ever going to make things like this I need to wield some tools. I would love to know what tools you use and how you learned to use them. Thanks!
Luke and Hailie Girl says
I am getting sick of the basket look, these crates are a fun alternative.. you make it look so easy though and I know it wont be for me!
House of Smiths says
Hey Amanda, Yes! I actually built these crates mostly on my own. It's hard to capture that through a picture, bc Cason isn't as handy with the camera. haha! But MOST of our stuff is TOTALLY do-able for anyone! 🙂
Erin {Lavender and Lemon Drops} says
HOLY CRATE! I freakin love those! Um Hello your's totally looks EXACTLY like your inspirational picture. Great Job 🙂 Oh and I could def. use a few of these in my home…. I might have to tackle a few once I finish some other projects 😉 I'll link back up to you if I do! Thanks for the tutorial 🙂
Mama Mimi says
Oh my goodness…SHELLEY!!! These are AWESOME!!! I totally want to run to Lowes so I can make one (some) right now! =)
{amy k.} says
those look fabulous! any chance you can email me about where you found that gray pillow with the white flowered stitching?? i love it!
amykathryn7 (at) gmail (dot) com
thanks so much!
Creative Raisins says
I love these, I featured you on my facebook page today.
Lisa @ Creative Raisins
Modern Frills says
These are amazing! LOVE LOVE LOVE them!
Alana Karl says
Love those crates, would love to do this!! Early American stain is my favorite color!
Lo says
Love these!!!! Definitely gonna try it out!
Melissa and Scott says
I'm officially in love with these! And your step by step makes it look pretty doable…is doable a word, it looks funny…
Melissa
Unknown says
I just pinned and FB this because I think it is that great. Wonderful tutorial and wonderful crates. Love the detail of the ropes. Thank you for sharing this fab project with us.
MTSmiths says
These crates are great! What type of wood did you use?
Morgan says
love these crates!! probably going to have to attempt to make a few for our family room .. one of these days! .. thanks for sharing 🙂
- Brittany aka Pretty Handy Girl says
Shelly, I love everything about them from the rope handles to the early american stain! I am pinning and stumblin' this tutorial. Great job.
Brittany
Meredith says
Fabulous tutorial Shelley! Thanks for the great step-by-step instructions. I featured your project at my blog today: welcometoheardmont.com/2011/09/friday-five-2/
Keep up the great work. 🙂
Meredith @ Welcome to Heardmont
Nuestra Familia says
Hi, cool boxes but looks like a fun project if I would make time…
I was wondering if you post the winner for the VRW? Or you contact the winner privately? Thanks! Ale
Debby says
These are perfectly adorable! totally making these for my house. thanks so much for the tutorial. I promise I will give you ALL the credit for this awesomeness when I post them on my blog. Have a great day 🙂
Amanda Whitworth says
Just found you by random but love what I see! Love the vintage boxes and it is EXACTLY what I've been looking for. Looks like I have another project on my hands!
Best,
Amanda
bullfrogsandbulldogs.com/
The Kaonohi's says
I know you posted this a while ago but I just have to ask where did you get those pillows? I am love! I love the crates as well!
Billie Jeans photography says
I have the same white chair you have in this picture & I was wondering how to clean it? I have tried & it seems impossible to do. Love the crates by the way.
jana.vedantam says
I'm wondering how these are holding up to the kids. I was thinking f doing this for toys.. but honestly I assume they'll hold up as good or better than baskets… right???
Unknown says
Thanks for the awesome tutorial! I can't wait to make these!
brittany says
I love the pillows in the crates! Would you mind telling where you got them? Thanks!
Rhonda says
Thanks so much for sharing! Definitely on the "to-do" List. These would be great anywhere and everywhere!
rhondalangford.willowhouse.com
KJMann says
Loved this tutorial, it's so simple and 1 box like that would put you out $50, i love the idea of customizing boxes and bins so that you have a perfect fit for your space, plus you get to say that you made it!
Meghan says
Can you tell us where you got those three pillow. You always seem to find the cutest pillows – I love them all!!
Meghan says
Can you tell us where you got all of the pillows? You always seem to find the cutest throw pillows – I love them all!
Anonymous says
Looks awesome! Now if only I had a hubby lol (:
chasekona says
These look great and easy to make, thank you for the inspiration! I will be sure to try some of these. I like the idea of using coasters too! I could put a few plants in one!
chasekona says
What a wonderful idea! I am going to have to try this soon. The use options are endless! I like the idea of the coasters on the bottom. I think I will put a few plants in mine. Thanks for the idea, the tutorial and the inspiration!!! My sweetheart bought me my own little air compressor last year for a different project, this would be a great reason to put it to more use!!!
Josh and Corinne says
Here's one more asking where in the world you got those adorable pillows and the throw–I LOVE the throw and I MUST have it! 🙂
The Transformed Home by Patty says
Great idea. Love the tutorial. Just what I was looking for.
Unknown says
This is so nice. So great and inspirational job you have done. thanks
Car Trailers For Sale
Talitha says
Can I just tell you how amazing and awesome you are? These are absolutely BEAUTIFUL! And I never knew about the precut wood! Geez! Thanks so much!
lovepomegranatehouse.com
Anonymous says
I gotta get me 6 of these!!!!!!
Anonymous says
Love Love your boxes…..Your tutorial is amazing. I think I'll try adding casters on the bottom?
Tart says
How do you figure out the size of the drawer compared to the size of the space it's going into? I already have the bench area done like yours and want it to go underneath like yours. I'm anxiously awaiting your reply! 😀
Tart says
how do you figure out what size to make the drawer once you have the space? [Like under a bench for example 🙂 ]
Anonymous says
I've bookmarked this tutorial sometime way back but now came back for it and I just have to thank you for it, the crates look amazing and making them doesn't seem too hard, I might just have to courage to try myself!
Pinja
Anonymous says
They look great. I like the rope pulls.
Another thought, take a scrap piece to test different layer effects. Use Ebony, sand it quick with your sander, then put a different color over it the same way.
Zoey says
Cute! I love the look of reused wood =)
Chris Austin says
First, stain it with Rust-Oleum Ultimate Wood Stain (Kona color), let it dry, then lightly sand it to remove some of the stain and give it an uneven look… then go over with the same brand stain in Sunbleached color, quickly wipe that off so it doesn't soak too much in… give one final light sanding if you want…. GREAT gray color! I made this barn door using that staining technique… pinterest.com/pin/178736678932817789/
Unknown says
Such a great tutorial! Those old crates are hard to come by where I live. Loved it so much I pinned it–Thanks!
Unknown says
I was online looking to buy some old wine crates…and then you came along.
Thanks for this tutorial…i've got so much old lightweight wood in my garage i can do this on a lazy weekend…as soon as the cold front were experiencing leaves….lol
christine suckhee hwang says
so nice…i will try to do this way…
thanks
TMinspired says
About to stain for the first time – an unfinished box for a gift. Was looking for different stains and a "how-to" and you just gave me so much confidence in saying that it's easy! Going to buy the Early American stain that you mentioned because it's the exact color I'm looking for! Thank you!
Unknown says
I love it. Color, size and rope handles…everything:)
Unknown says
I know I am a little late on this, but you can also use vinegar and steel wool to get that same look. Google that to find instructions.
Unknown says
How much did this cost?
Unknown says
About how much did the wood cost you?
Lauren says
Hi there! I know this post is a few years old, but we used it over the past few months to create our wedding centrepieces. We scaled them down in size to just under one square foot, stencilled our initials on one side, and filled them with fall mums for our October wedding last weekend 🙂 They were a hit and guests were snatching them off the tables! Thanks for the inspiration 🙂
Unknown says
Thanks for this tutorial. I have just moved to Portugal and my house is way to small. I need these boxes in my life. My husband is a joiner but he is too busy to make these but with your tutorial I think I can do it, plus we have just found a timber yard so I know I can get the wood. Wish me luck.
jamie says
I love these so much and I just made 2 of these and I stenciled a vintage stamp on the side. I love them. I couldn't find the rope by the yard? Also how did you attach the rope? A knot
On the inside? Thanks for all your amazing ideas!
jamie says
The rope that I found by the foot is almost and inch thick? Did you just tie a knot on the inside to hold the rope handle?
I love these, thanks for the easy tutorial!
Riz says
I loooove this! I was looking for vintage boxes or crates too and apparently they cost a lot!
Unknown says
Really awesome wooden crate idea. Its a good thing for storing our belongings.
ajstechnoflow.com/