


Master Bathroom Vanity Makeover
Yippy-skippy! This week is going to be ALL about our Master Bathroom Makeover, and today I thought we’d start out with a few post links and reminders of things we’ve already covered/conquered in this itty-bity space.
This small bathroom has DEFINITELY, by FAR been our longest, most design challenging project to date, and Cason and I both agreed that it was because we kept trying to make the space bigger, better and more grand… when it wasn’t really possible. ha! Once reality hit and we figured out that walls couldn’t be knocked down and our coffin-type shower wasn’t getting ripped out and replaced (due to having no budget for that) we finally came to peace with our design plan and moved forward.
🙂
To read individual posts about progress made on our master bath so far, click on the images below.


Now that you’ve gotten up to speed on some of the posts you might have missed over the past TWO YEARS… yes, it’s taken us THAT long to get around to finally finishing and posting about this freakin’ bathroom… we wanted to show you in a few posts this week, some more up-close details and tutorials on how we refinished a few specific areas in this space, to make our master bathroom feel and look as good as we could possibly make it.
First, is our vanity!
Because our master bathroom is super small, we knew that our vanity area (taking up as much room as it did) was really going to have to set the tone for almost our entire space.
Just a quick reminder: Cason leans more towards a modern style, and I tend to go heavy on the cottage-feel… so mixing the two together in perfect harmony can sometimes be a little challenging, but in our experience it always has a pretty great result!
So we moved forward with clean crisp white cupboards (with slight distressing) and sleek modern pulls and handles. This is what we came up with in the end!

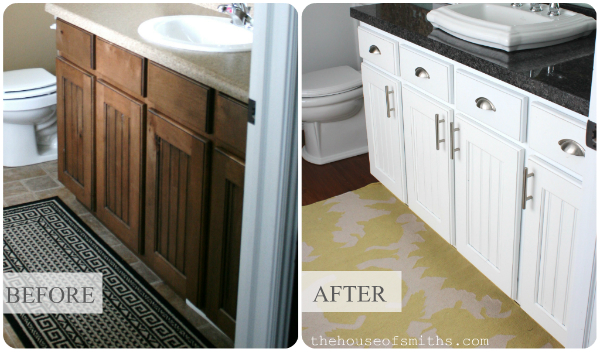
We love it, and it definitely reflects our style a LOT better than the look we had before.
Here’s how we did it:
* First we removed all of our cupboard doors and drawer fronts. I would also recommend taking off your cabinet hardware at this point too. We kept ours there because a LOT of our screws were really stripped and well… we were lazy and our hardware was all going to be hidden anyway.
🙂
* We cleaned the face of the cabinet with some heavy duty TSP cleaner, to get off any residue from hairspray, dust or other grease.
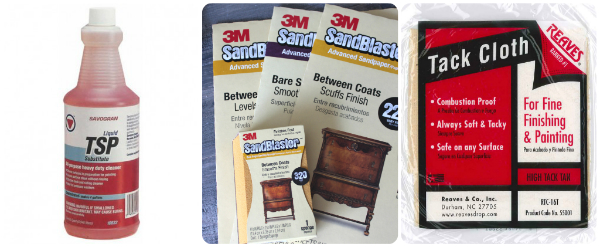
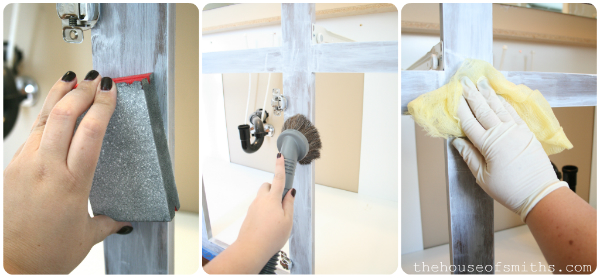
* After that was done we used a medium and then fine grit sandpaper to roughen up and then smooth out the entire face of the cabinet.
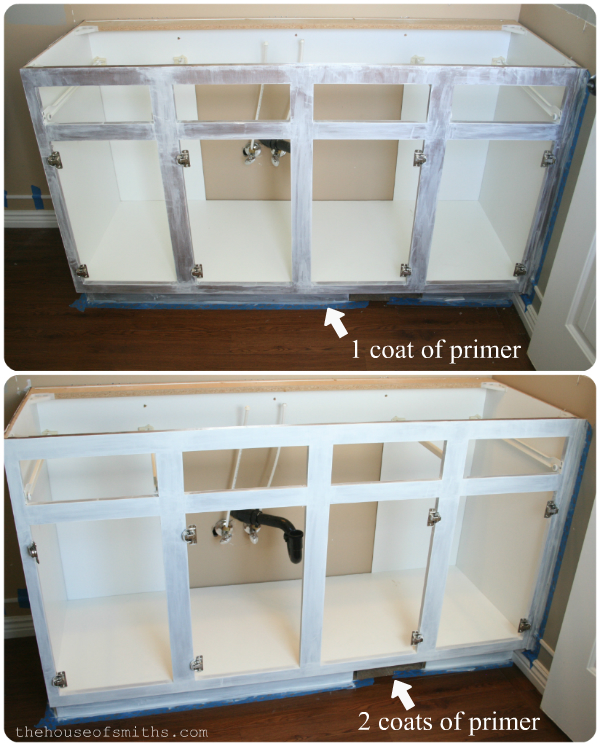
* Once the cabinet was dust free, we went in and painted the cabinet with a coat of primer.
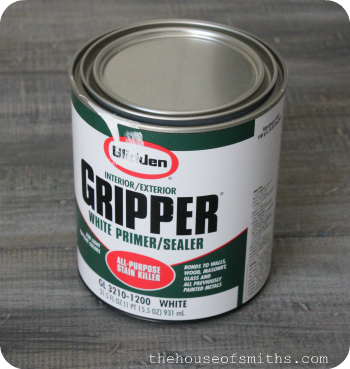
* We applied 2 coats of primer total.
* Between coats we used a very fine grit sanding block to smooth out any brush strokes or dried paint splatters. To clean up any dust (to ensure a super smooth surface) we ran a vacuum over the cabinet frame and used a tack cloth between coats.
While the primer was drying, we moved onto the doors and drawer fronts.
And this is where the cheating comes in…
🙂
I’ll be the FIRST to admit that I am quite the perfectionist, and seeing that our cabinets were faced with a detailed beadboard-style front that had lots of grooves and nooks… I just couldn’t stand the thought of taking oodles of time hand painting them on my own with the risk of them looking sloppy and streaky in the end.
We DO have a small paint sprayer, but by the time we get it out, load it up, spend all the time building a spray booth, painting the cabinet fronts with multiple coats of paint, polyurethane-ing them, yada yada yada……….. yeah, like I said, it’s just not worth my time. So that’s when I turned to my cute, talented, local, furniture-refinishing friend Sausha from Sweet Pickins, to do them FOR me!
🙂

Sausha is a genius at refinishing furniture and I knew that with all of her nice, professional spraying equipment, she could have my doors and drawer fronts sprayed in no time flat. In just a few days, these babies were perfectly painted, done and worth EVERY penny.
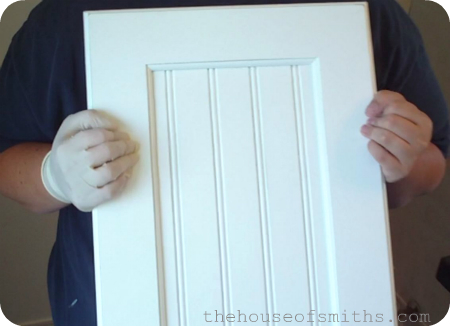
* While the cabinet fronts were being sprayed I applied 2 good coats of our white latex paint to the cabinet fronts to finish them off. I didn’t use any polyurethane on the face of the cabinet, mostly because you can hardly see it and with all the layers, I really didn’t think it needed it; and so far, I’ve been right! Over a year later, everything is holding up just perfectly!

* Once we had the face of our cabinet done, our new granite counter top from Granite City and sink were installed and the cupboards and doors were attached to their hinges again.
* The finishing touch was the hardware for the cabinets that Cason picked out at Lowe’s. They’re definitely more modern but I love the clean finish and shape against the beadboard-style door fronts.
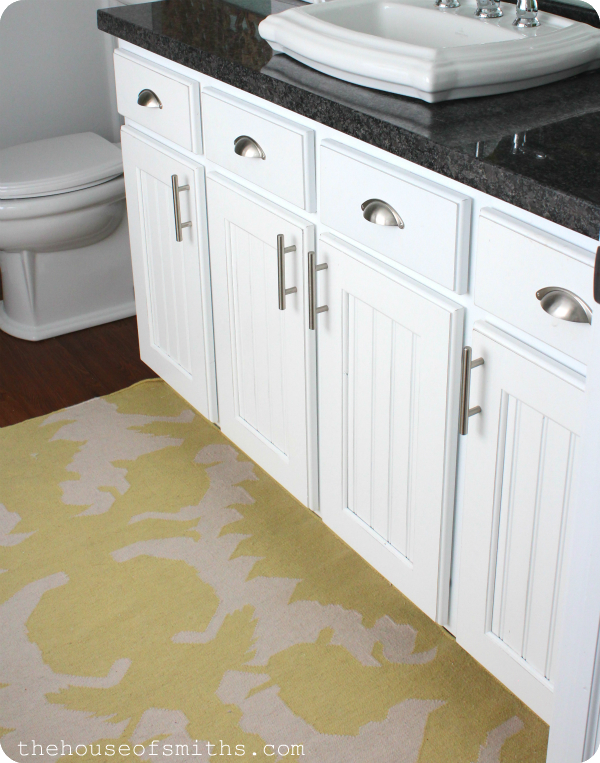
To give the space a little warmth, we added a buttery yellow Thomas Paul rug in front of the vanity that we purchased on sale from a Joss & Main event. What I love about the rug is that the print is more modern, but the color and texture feel a lotta-bit cottagy… which you know I love.
🙂
Check back with us tomorrow, because we’ll be posting about the layered molding wall treatment and towel hook system that we have going on in this space as well! It’s super easy and I know you’ll love it.
Till then!


Bathroom Remodeling says
I love your new cabinets!!! Especially the black granite countertops – they look fabulous!
Carrie from Talking In Space says
Love it! So gorgeous, and I love how you combine your style with your husband's yet it flows together so well.
Unknown says
Love it! The handles you chose are perfect!
Leslie
houseontheway[at]gmail.com
Classy Clutter says
Looks gorgeous! I love that the beadboard TOTALLY stands out more painted white. I love the modern handles and pulls too!
Awesome job!!
Mallory @ Classy Clutter
Patty V says
lovely, I want mine to look like that.
Linda @ Home is Where My Heart is says
Great job on your bathroom. I LOVE your cabinets! ~Linda
Anonymous says
Looks great!!!! I actually painted a vanity in my powder room this past summer and have been debating if I should coat it with polyurethane – any thoughts?? think it is too late??
House of Smiths says
Thanks so much! We were a bit nervous about doing such dark granite, but it actually works really nicely and gives the space a "spa" feeling 🙂
House of Smiths says
Thanks Carrie!
House of Smiths says
Thanks Leslie!
That was all Cason, I was a little hesitant, because they are SO modern, but I think they work really well now that the room is all done!
House of Smiths says
Hmmm… I would definitely say YES if it was a kitchen, but in a bathroom I just don't know if it really needs it that bad, ya know?
If you're really worried about the paint chipping or people being really rough on the cabinets, I might do it, but otherwise, I'd probably just leave them as they are.
If you DO decide to poly them, make sure you use a NON-yellowing type of poly. We learned this the hard way on a project a few years ago. bleeeh! This holds especially important if you're putting poly over a white surface.
Forsythe says
Yeah, I am glad you have gotten so much done in your bathroom. Redoing a bathroom I think is the hardest room in the house!
Jen says
Your vanity looks gorgeous!! I have ugly light wood cabinets all over the house that I have wanted to paint white for awhile. It looks amazing and really brightens up your space!
HGTV Home Furniture says
LOVE what you did with the cabinets and counter-tops! The transformation of just that vanity looks amazing! Great job!
GirlyWhirlyMommy says
Love it, all.of.it! I have a dumb question though…did you have to cut off the base of the sink bowl to put it in there or did it come seperate from a pedestal? Do you caulk it at all underneath it? (I can't count: that was three questions! LOL!) 😉
Anonymous says
Thanks so much for your input!!!! I was considering it to prevent chipping – would hate for THAT to happen after ALL the time I took to paint it 🙂 So happy with the results, I think I will pass on poly to prevent any chance of messing it up. LOL!
BTW – Love your blog! You have such a great sense of humor and super sense of style! You are so down to earth and truly inspirational 🙂 Thanks!
Unknown says
Looks great! What kind of cabinets did you have? Are they wood? I have these cross thermo heated vinyl cabinet doors…the rest of the cabinets themselves are laminate. Any advice on painting the vinyl doors. They are 15 years old and starting to crack.
Anonymous says
I am starting a remodel and have a similar layout. Curious as to why you did not consider a knee wall to visually separate the toilet from the vanity.
srpprcrftr says
So far your bathroom is looking good. Love how the vanity looks with the granite top and sink. Very pretty.
At least your hubs will paint, etc. I can't get mine to do things unless I start them then he'll have to take over since he's a control nut and thinks I don't do things correctly. Hmmm, wonder why that is. I hate playing head games to get him to help out.
I'd love to redo an old chest for our vanity. We have a counter top out in shed.
Will look forward to seeing the changes and the final result. Happy Week.
Our Pinteresting Family says
Your bathroom looks fantastic. I love your wall treatments and your colors. Megan
Jennifer @ Delightfully Noted says
It came out beautiful! I bet you smile every time you walk in there now and that rug adds the perect touch.
Anonymous says
Beautiful! What sheen did you use for the latex paint? Hard to tell if its semi gloss or maybe satin?
Alena says
Beautiful! What color of white did you use on your cabinets? There are so many whites that I don't know which is best. I feel some are too bright and some are too cream. Help!!
Thanks
Alena says
Beautiful! What color of white did you use on the cabinets? There are so many white's to choose from. Some whites are too bright white and some are too creamy. Help!
Swanbrown says
Lovely and simple