


Skincare + Flawless Face Makeup Tutorial

We’re moving right along in this Tell me More series about creating your best SELF, so if you missed out on the initial post, then you might want to go back and read that first.
Before we start though, I need to send out a little disclaimer:
I am NOT a professional. I don’t know what your your individual skin needs are or how you’ll react to the following products, so PLEASE research all of that out on your own, before trying any of them. I’m choosing to talk about products that work for ME, but may also work for YOU too!
Also know that when I share my tutorials for makeup application, it’s coming from years of trial and error, along with a few tips from the pro’s. I may not use “that brush” how I’m suppose to, or apply “that color” the way you would, but again… this is ME, sharing my individual techniques with YOU, in hopes that you can take a little something away that you didn’t know before!
Also know that when I share my tutorials for makeup application, it’s coming from years of trial and error, along with a few tips from the pro’s. I may not use “that brush” how I’m suppose to, or apply “that color” the way you would, but again… this is ME, sharing my individual techniques with YOU, in hopes that you can take a little something away that you didn’t know before!
Okay, now let’s get going!
Today I’m talking all about what I like to use as far as products and techniques, to get my skin and face ready for the fun part of makeup… color!
First, let’s talk skincare.
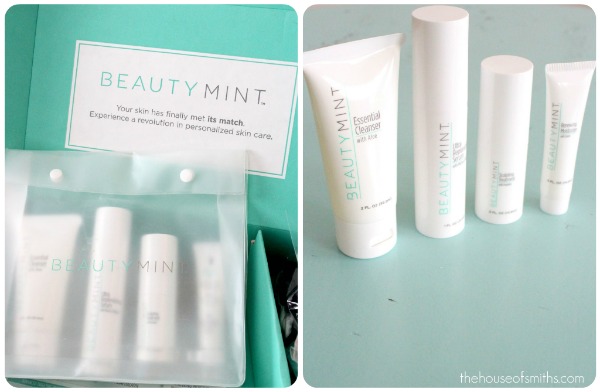
A little while back I reviewed a product called BeautyMint. I was open to trying anything to help me with my dry, splotchy, sometimes prone to breakouts skin. After the first round of this product, I was hooked! I seriously saw a HUGE improvement in the way my skin felt and looked… no lie. I tend to have a lot of red in my face and random dark spots from the sun, and not only that, but my skin is SUPER sensitive to almost everything. Although quite a bit more money than drugstore face wash and lotions, the BeautyMint product line has definitely made it’s way into my monthly budget. Honestly, there’s NO cover up in the whole world that can totally hide bad, bumpy, blotchy skin, so whatever you do, figure out how to get the BEST skin WITHOUT makeup first!
Next, let’s chat about eyelash extensions and eyebrow waxing.
I’ve said it once, I’ve said it twice… and I’ll say it a third time, for ME, eyelash extensions and groomed eyebrows are a MUST! For those of you who have asked, Heather from Aqua Spa is my personal eyebrow and eyelash whisperer.
🙂
Whenever I mention this beauty regimen people always have questions, so I’ve tried to answer a lot of them here in this post. I don’t want to sound like a broken record, so I’ll just say these few things.
1. I’ve been keeping up on my extensions for almost two years now, and I’ve never had any problems.
2. Not all extensions are created equal. I have been getting mine done by Heather since I started and compared to my friends who get them done at nail salons or by friends who aren’t professionals, well let’s just say… you can tell a BIG difference.
3. Eyelash extensions are meant to compliment your face, not overpower it. Want to know how I knew that Heather was the best at what she does?… It’s because people would say things like, “You have such pretty, full lashes” or, “I would kill for lashes that great!”
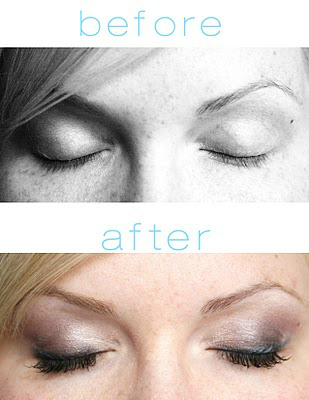
To most people who weren’t familiar with extensions, mine just looked naturally lengthy and thick! (which you can see from the photo below, is SO NOT true) ha! This is how extensions are SUPPOSE to be, NOT unrealistically super-long, hairy-spider-leg-lookin’, mascara-filled protruding objects that heavily flap from your lids!
Got it ladies?… okay, good.
🙂
Now that we’ve covered the prepping part of getting a great face, it’s time to bring in all the fun little products that help us achieve that flawless look that actually LASTS throughout the day!
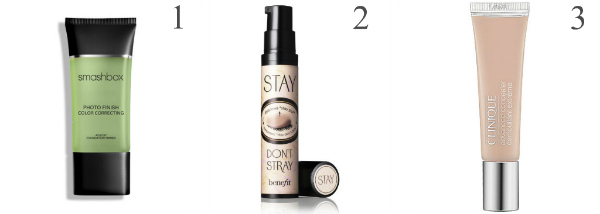
1. Smashbox photo finish color correcting primer – green: This is pretty much like fine-line and big pour filler in a tube. LOVE this stuff and use it EVERY day before any sort of foundation hits my skin. It evens out the texture of my skin and allows for a smooth foundation application.
2. Benefit’s Stay, Don’t Stray eye primer: I apply this on my lids, under my nose and on my chin… or really any areas of my face that are really red. It’s basically an additional primer that helps any sort of concealer/shadows stay put, and appear more vibrant than they would without it.
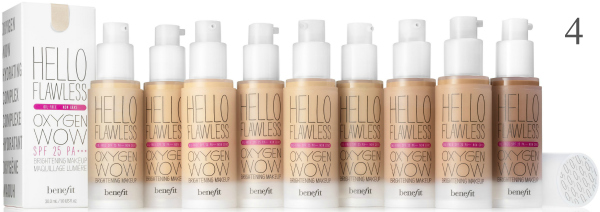
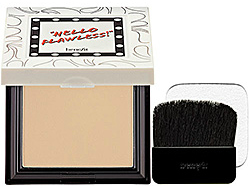
4. Hello Flawless Oxygen WOW Foundation: Yes, I’m jumping ahead, but this is the next step in my routine. I use a sponge applicator to apply this AWESOME foundation all over my face and make sure to rub it into my neck and hairline well enough that it blends. Nobody wants to have a foundation line running around their face, am I right?
3. Clinique’s Advanced Concealer – light: Probably THE BEST concealer on the market that I’ve found. I dab this on any blemishes I might have, dark spots and directly under my eyes to cover any discoloration that wasn’t covered with my all-over foundation application.
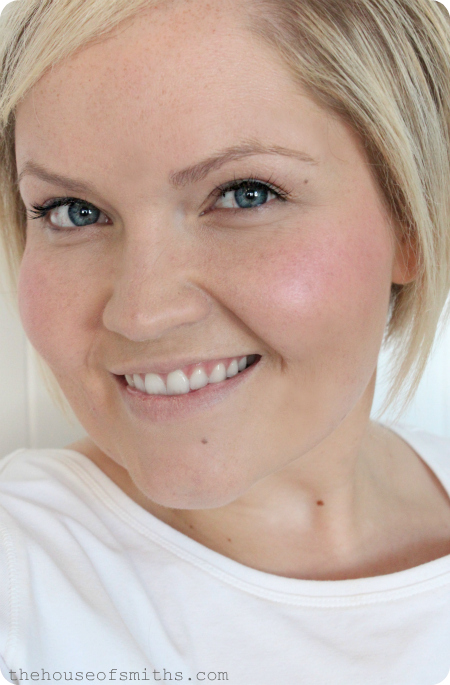
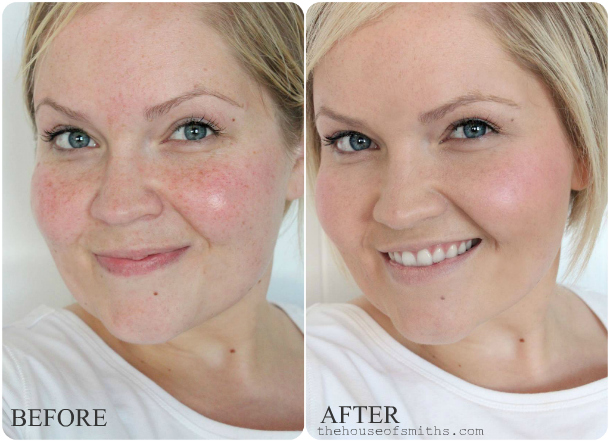
It may sound like a lot, but those 4 steps take me a total of about 3 minutes, and when I’m done, here’s a before and after of what my skin looks like. And yes, I resisted the temptation to Photoshop or filter… so you get me, in my natural state through the entire tutorial. lucky you. ha!
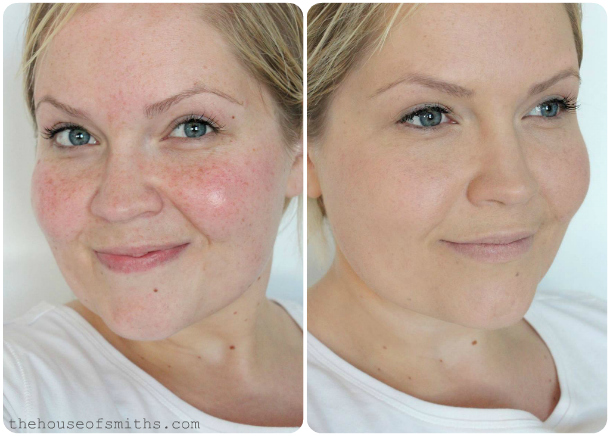
Next, is highlighting and contouring. Something that for MY face, is really important. Unlike some women I was “blessed” with a super round face shape, and regardless of how much weight I lose, I have the roundest little puffiest cheeks that you ever did see. LOL. For this reason, I like to use the illusion of light and dark, to create more elongated contouring where I may not naturally have it.
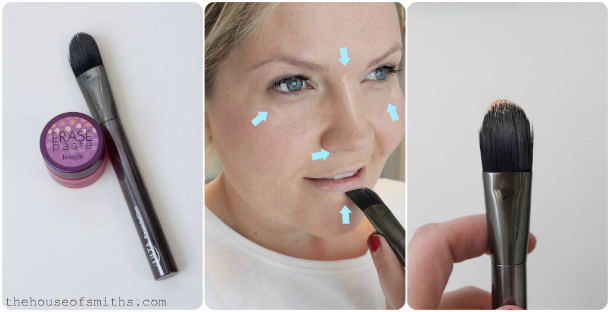
First I use Erase Paste from Benefit and with a foundation brush, run a bit under my nose and down the middle, swipe a bit on the top of my cheeks and then some under my bottom lip. I blend everything in and then sweep a light dusting of Hello Flawless face powder over everything to set my liquid products. Next I take a Buki brush with a little of Benefit’s Hoola soft Bronzer and blend it in to darken up the areas that need more definition… like right along my cheek bone and around my jawline, giving me the appearance of more definition in my more “softly featured face.”

Once that’s done I take my blush brush and run some powder form blush along the apples of my cheeks. Because my cheeks are already so round, I make sure to run the blush in a stroke along my cheek, rather than around, in a circle formation… if that makes sense.
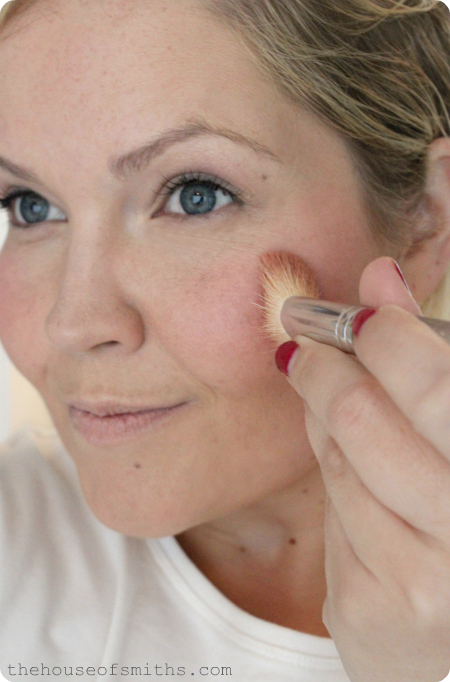
I picked up my Cover Girl Plumberry Glow at Target for a few dollars. If your skin is dry like mine, then you might want to consider a cream blush. To be honest, I use both. After my initial swipe of powder blush, I take a small amount of Urban Decays Afterglow in Quicky, and touch the tops of my cheeks with it. It creates a glowy look that helps your face to not look so powdery.

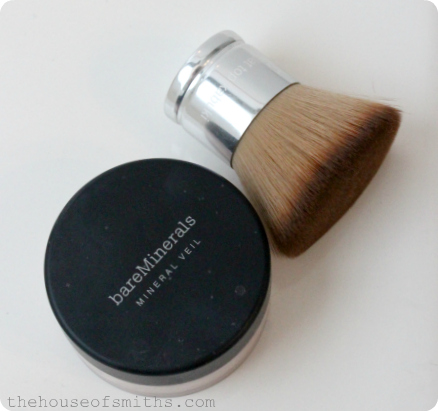
My last step is a once over with BareMinerals mineral veil translucent powder and a kabuki brush. This process isn’t totally necessary, but I feel like it sort of seals the deal and “sets” everything well, giving all your steps a flawless finished look without sending off a powdery vibe.
I know that it may seem like a lot of products and steps, but really, these items last FOREVER. I bought a lot of these things along the way and have only replaced my face powder, foundation and smashbox primer in the last year. It really is a very quick process and the results that I get from using these great products is TOTALLY worth every penny to me.
My next post will be all about color, so make sure you don’t miss it!
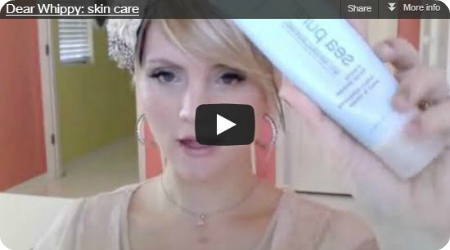
Another great video tutorial you might want to check out is Dear Whippy: Skin Care, by Becki. It’s a great reference video to some other great products that also might work out awesome for you!


Serena says
I think I like the "before" better! You were more glowing! 🙂
Anonymous says
You are such a beautiful person. Thanks for taking the time to share what you've learned!
Sherry @ Thrift My House says
Great tips! And it looks very natural. Love the eyelashes.
Anonymous says
Thanks for posting!!! I love that you used real photos for before and after. I have totally slacked on my facial routine and it's time to get back into it. I like what a natural look this gives you! SInce having my 2 babies, my skin has gone from oily to dry and still blemish prone..so I may be giving Beautymint a try as well.
Jesse says
Shelley, this is such a great post! I also use the green primer from Smashbox and I absolutely cannot live without it. It is the best that I've found for redness, which I suffer from (lucky me!) 😉 I've always thought you were so gorgeous, but you've even taken it up a notch! The pic of you from the previous post in the black spotted (polka dot) shirt with the green earring on…hello model?!?!? Seriously, beautiful beautiful! I'm loving these "tell me more" posts! 😉 Jesse @ Scout & Nimble
Renae says
I see your beautiful face and see so similiarities to mine. High cheekbones, freckles, you know, the good stuff. But I also see the pink cheeks that aren't so cute on us non-toddlers. 🙂 I think I'm going to try Beauty Mint. I signed up a while ago to check it out but I never got around to ordering anything. I don't have a good skincare routine and if I resolved to do anything this year it was to get my skin to behave. 40 is coming in May and I'd rather look 35 than 40! 🙂 Can't WAIT for the color post. Really looking forward to it. Thanks!!
Brittany B says
I love your blog and normally lurk, but I wanted to share for once! I have the same type of skin, but with the added fun of combination skin. I have used dern near every face product under the sun but nothing worked. I finally decided to try tea tree oil on a whim and HOLY MOLEY! It is AWESOME! I just put it on a cotton round, swipe it on my skin at night and let it be. I have had NO breakouts since the third day of using it, and my skin is soft, healthy looking, and no creepy redness! It's also incredibly inexpensive. Why don't you try that? I know that a lot of us moms are near broke most of the time and can't afford fancy high-end facial products, so it might be good for your other readers as well who have the same skin issues, but can't afford fancy stuff.
Jenn Korolewski says
I'm writing down ALL of those products! I have been looking for a good contour color and will definitely have to look into the Hoola Bronzer. Thanks for the great post!
jackie jade says
your makeup looks so great! – so natural and fresh. i don't have much of a makeup routine right now besides eyeliner/mascara, but i'm finding that i'm starting to need more foundation, blush, etc. and i LOVE benefit products too! will have to try out some of your tips.
— jackiejade.blogspot.com
Just Jaime says
Thank you for all the information! I've just been using powder, but I'm ready for a little more but I really want it to look natural (who doesn't, though?) anyways, thanks! I'm pinning!
Anonymous says
This was so helpful to me. Thanks!
Unknown says
Thanks for keeping it real! I love your blog! Keep it coming!
Lauren says
I love that you enforce this is what works for YOU! I know that my skin would probably hate all those products but at least now I feel like I should experiment to find what works for me and my skin. You're so beautiful even without the makeup!
Kate Harvey says
You look beautiful!!! Really 🙂
Lauren says
You are beautiful without or with make-up! Thank you for sharing your tips and products.
Kristen says
I always like reading about what products others use on their faces, as I have a large purple birthmark that I have yet to really figure out how to hide very well! I have never heard of some of the things you use, so I'm glad to have new items to try. Thank you! You look great!
Jule aus 9B says
You are a beautiful woman, even without makeup. 🙂
Jule
Sarah says
I use the benefit foundation also and LOVE IT! I was a little nervous the first time because it really changes the color of your skin. My make up lade informed me that was simply the foundation EVENING my skin tone and removing the redness (a must!). Love this tutorial 🙂
Elizabeth @ Southern Color says
Love this step by step tutorial! You look great without makeup 🙂 But I enjoy seeing other people's make up routines.
Unknown says
Love Benefit's HELLO Flawless Foundation! it's what I used as well.
LovePink says
Thanks for this, I have been looking for some refreshers for my "thirtysomething" skin. I just hit up Ulta on my lunch break to pick up a few of these!
Heather says
Wow, so wonderful of you to share all of this information. It is refreshing to see the before and after pics and know that these products and tips will actually work. Seems more believable coming from you than from a paid model/actress. Thanks for sharing! Looking forward to the next part…
Anonymous says
Gorgeous! Thank you for opening up and sharing with us! I think you are fabulous. 🙂
Erin says
Honestly – I would love to have your "before" skin!! I am also a very red, very sensitive skinned gal – thanks for the suggestion!! I've got my fingers crossed!!
Anonymous says
You are gorgeous and your makeup is flawless but that hurt my brain. I wish I was more motivated to know what half that stuff is.
♫ christine says
Thank you! I pinned this so I can reference it frequently. This is the kind of information that I NEED because I am so clueless! I appreciate you taking the time to do these posts because they are especially great for people like ME! I appreciate you. 🙂
Unknown says
So you're using the Benefit concealer to highlight, I'm gathering? I've been wanting to try the Hello Flawless foundation and powder – glad to hear good things! Maybe when I run out of my Revlon Colorstay I'll give it a try!
Rachel @ Following In My Shoes says
I have just started playing with contouring lately … but using cheapy drugstore products and brushes because I wasn't sure if I'd be able to pull it off. Turns out, it makes a HUGE difference… now I'm off to check out the products you shared.
p.s. You are adorable!
Anonymous says
I thought a couple months ago you chose Mary Kay as your favorite foundation…I am confused…fill me in on the change and why you made it. Love your favorite things posts and congrats on the weight loss!!
Stephanie says
Do the products seem like they would last a while? they are a lot more than what I would normally spend on make up, but if they do a good job and would last a while, it would be worth the investment. You look great both ways, btw
House of Smiths says
Yup! I use that to highlight and love it! 🙂
House of Smiths says
Yes! I still love Mary Kay 🙂 It's a great foundation too! But they stopped carrying the full coverage option and I'm not as thrilled with their medium coverage. For some reason I feel like the makeup seeps into my pours a bit too much or something. I wonder why they got rid of the full coverage. booo hooo!
House of Smiths says
yes! Totally, I talked about that towards the end of my post 🙂
Besides the foundation and powder, I haven't had to replace anything for about a year. Everything lasts a REALLY long time. I know that it seems like a huge purchase all at once, so I recommend buying things as you have the money. Maybe try one or two things each month, if you have a little extra spending cash 🙂
If you go to Ulta or Sephora you can also test out ALL their products BEFORE you purchase them, which is always nice!
Lindsey Heath says
bang on post as usual!
Mindy says
I am addicted to Erase Paste. That stuff makes such a difference. I use the same foudation- for now- and I like it, but will probably try something else when it runs out soon. I men, I do like it, but I don't love it!
Cyndi says
I have heard that Sephora has a very generous return policy. You may bring back anything, even if it's almost used up, for store credit, even if you didn't purchase the product in their store. You just need to make sure they carry that product at Sephora, and I think you don't even need a receipt!
Anna@Directions Not Included says
You are adorable and look amazing. I use and love 1 and 2 on your list. We have similar skin tone and problems so I need to check out the rest of the goodies. I'm a sucker for makeup and face products!
Rhonda @ home.made. says
What a great post! You're beautiful, of course, in the before but the after… WATCH OUT HOTTIE!
Can't wait to try some of these products… and how big of a dent do the lash extensions put in your wallet? They look great but I don't know that I can afford them 🙁
michele says
oooooh, i needed this post! how lovely are you with and without makeup!?!
when you have a moment, we'd love to have you stop by to say hi!
smiles to you.
michele
hello lovely inc.
Unknown says
Shelley, thanks so much for sharing your tips. You are beautiful inside and out!
Ruth says
The pores of our skin can be so huge around the nostrils and so teensy around the corners of our eyes and guess which area needs more foundation? Yes, the pores around the nostrils that want to hold onto every single bit of makeup or dirt possible. At times it does feel as if we are pouring the foundation into our pores.
Kim A says
I just started reading your blog and I can't get enough (not in a creepy-stalkerish way). You are just so adorable! I just printed off your picture to take to my hairstylist so that I can get your cut. Hope you don't mind! Look forward to reading the rest of this series!
Jessica says
Thanks for sharing all of this Shelley! I think we're skin twinsies… and I mean that in a totally non-creepy way 🙂 I have the same fair, red, blotchy skin. My bathroom drawer is like a cosmetic product wasteland!! I'm so excited to try some of these! I went and ordered the beautymint line yesterday. And I LOVE Benefit! Amazing that I only own one of the products you listed though!… the Hoola powder. Love it though. Have you tried "high beam" from them? You would totally love it for accenting your cheek bones and giving you that dewey look you love.
Thanks for sharing!
Tami says
Love this post! I am trying the foundation right now-so far, so good. I have really sensitive skin so changing any products can be a disaster. I do have a question about the eyelashes. I had some done at a nail salon, and I ended up hating them-they irritated my eyes after a while, and I pulled them out (along with some of my own-not a fun time). I would like to try them again since you say what you get are different, but how do I know that I am getting the kind you get? I am in the Dallas area-does the lady that does your lashes know anyone here that does the kind you get?
Andrea says
Awesome info. Very appreciative of the time it must have taken to put togetheen
Btw I couldn't help but start singing grease when I pulled up your page, tell me more tell me more like does he have a car.
Lindsay Artsy-Fartsy Mama says
Great tips!! Thanks so much for sharing 🙂 You are beautiful!
callie says
Is it humid where you live? Just curious how these products do in the humidity, as I live in in the Hot humid South! Lately, I've enjoyed MARY KAY's timewise matte foundation. Love it so far
Anonymous says
You are beautiful! Thanks for sharing your tips. I LOVE your eyebrows!! Do you have any suggestions on how to choose the perfect color of foundation?
🙂
Anonymous says
You are gorgeous!!! 🙂 and even more gorgeous with make up… I wanted to give everyone a little tip also… If you do not want to spend the BIG bucks on Smashbox or any other HIGH END Primer… You can ALWAYS use Monistat Chaffing Gel.. Now this isn't a gel for your private areas its a get for chaffing.. Which you can chaff ANYWHERE!!! Is has the same silicone that Primers do… I use it and Its amazing and as a Professional Make Up artist it does same on $$ 🙂 Hope this helpled 🙂
Esme's Mommy says
I just found your blog today and I went and got some of these products this afternoon! I haven't really worn anything more than loose powder for many years and this post crossed my path at just the right time. I'm so excited for tomorrow morning to "play"! I had never heard of Benefit before, but I have a feeling I'll be getting more of their product soon.
Thanks for the tips beautiful girl!
MomLaur says
Love the eye makeup in the before/after photo with hte lash extensions! DO you have a tutorial for how to do it?!?!
Anonymous says
What color of foundation did you use?
Melinda says
Love the tips! My face is super round too, I need to learn how to contour!
Aimee says
Sheesh, you are beautiful! Loving these posts.
Carolyn Smith says
Good for you! You are beautiful inside and out – it totally shows. I love that you are feeling confident. Thanks for sharing your transformation!
JenniferIsAwesome says
Love the review!
Anonymous says
Alright I wrote down all of the products and am going to head out to Sephora!! I would LOVE to know the products and steps to your eye make up you have on in the after photo with the eyelash extensions!! It looks so natural but yet ready to go out!! Thanks, Kelli
I am also on a "eating life change" and workout program, I was inspired by your blogger on a diet…LOL!! You are looking good!
Unknown says
is there a way you can still cut down on the redness but not cover up your adorable freckles? FRECKLES are so wonderful to see. i used to have them and miss them so much. now when i see pix of models with freckles i cannot believe how much i love them, it makes people so individual and 'stand out' from the crowd. i actually saw a model somewhere penciling them ON, she liked them so much (and she didn't have them). Your cute before and after pix are impressive, but honestly, I LOVE your fresh faced freckles. I have to say you look how I would describe as 'country beauty.'
Anonymous says
I ran across this post by chance, dropped my plans for the day, and took this list to Sephora! I've been desperate for a new makeup routine and this just made my day! You have made me (and the sales lady at Sephora) very very happy!!! Thanks!!
Brit says
I love your freckles! I checked out the site for beautymint and started taking their "find your fit" quiz. It's weird to me how they assume you'll eventually want "help" with wrinkles/saggy neck/etc. They ask how important things like that are to you and the 'no' option is worded as "not YET interested." 😛
VividSaavY©2010 says
Can i say Gorgeous?!